温馨提示:这篇文章已超过442天没有更新,请注意相关的内容是否还可用!
摘要:本教程详细介绍了ASP.NET前后端分离技术,通过WebApi实现后端服务。前端采用Vue3、ElementPlus、Axios和Pinia等技术,全程指导开发者搭建项目框架、实现数据交互、组件开发以及状态管理。该教程内容全面,适合初学者和进阶开发者学习参考。
文章目录
- 前言
- 1、.net core 执行过程
- 2、中间件的执行过程
- 3、AOP切面编程
- Swagger
- 添加Swagger注释
- JWT
- 1、解析
- 2、配置JWT
- 配置SqlSugar
- 0、引入`SqlSugarCore`包
- 1、编写`Context`类
- 2、配置实体类
- 3、创建`Service`服务类进行数据库的CRUD
- 4、配置Controller进行路由
- 依赖注入与IOC
- IOC
- 依赖注入DI
- Autofac轻量容器的使用
- 使用Autofac完成AOP日志
- Webapi的操作返回值和方法参数
- 返回值ActionResult
- 操作方法的参数
- URL
- QueryString
- 请求报文体
- 总结
- VUE项目结构
- 主要文件
- 项目运行流程
- 添加Element-ui、AXIOS
- Axios与pinia
- AXIOS
- 使用npm等包管理工具下载axios
- 创建axios实例、封装get、post请求方法
- 封装api接口调用方法
- 在页面中调用api
- pinia使用
- 使用npm下载pinia
- 创建Store文件进行状态存储
- 在页面组件中实例化状态并赋值
前言
1、.net core 执行过程

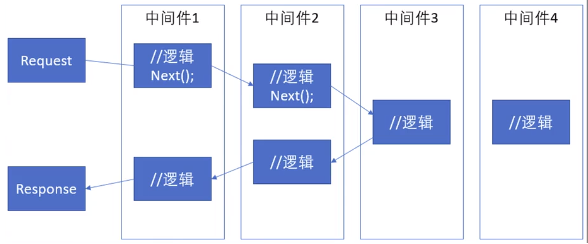
2、中间件的执行过程
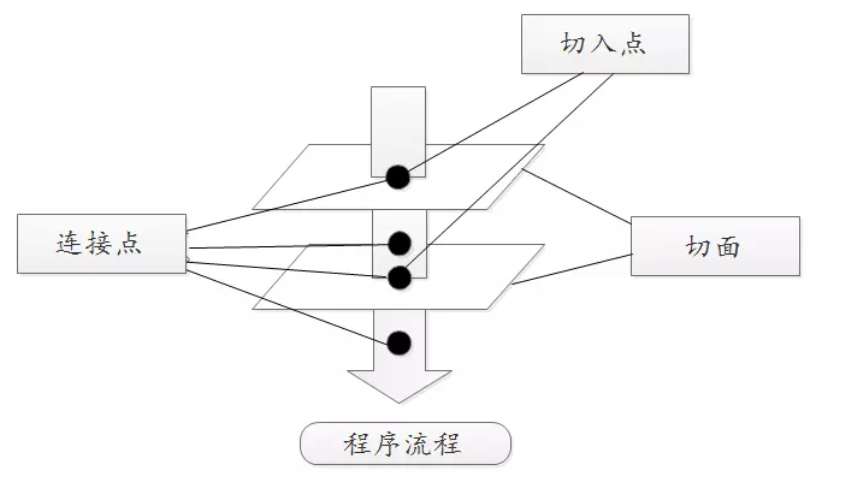
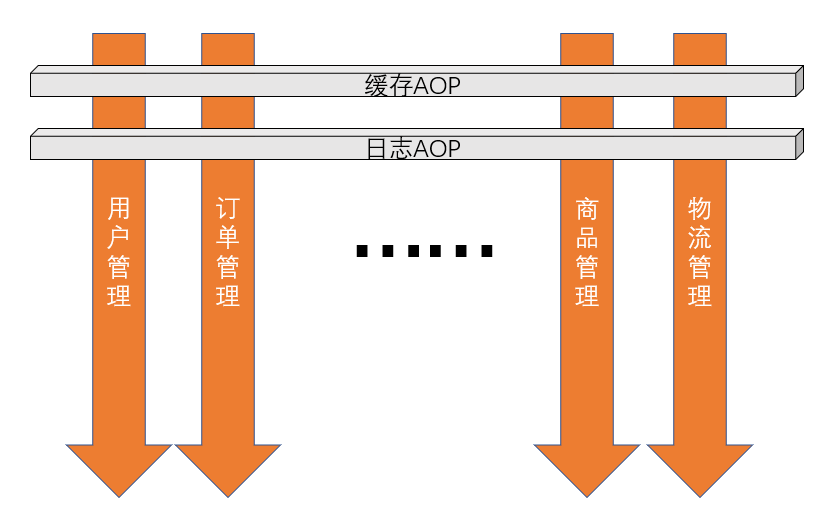
3、AOP切面编程
Swagger
添加Swagger注释
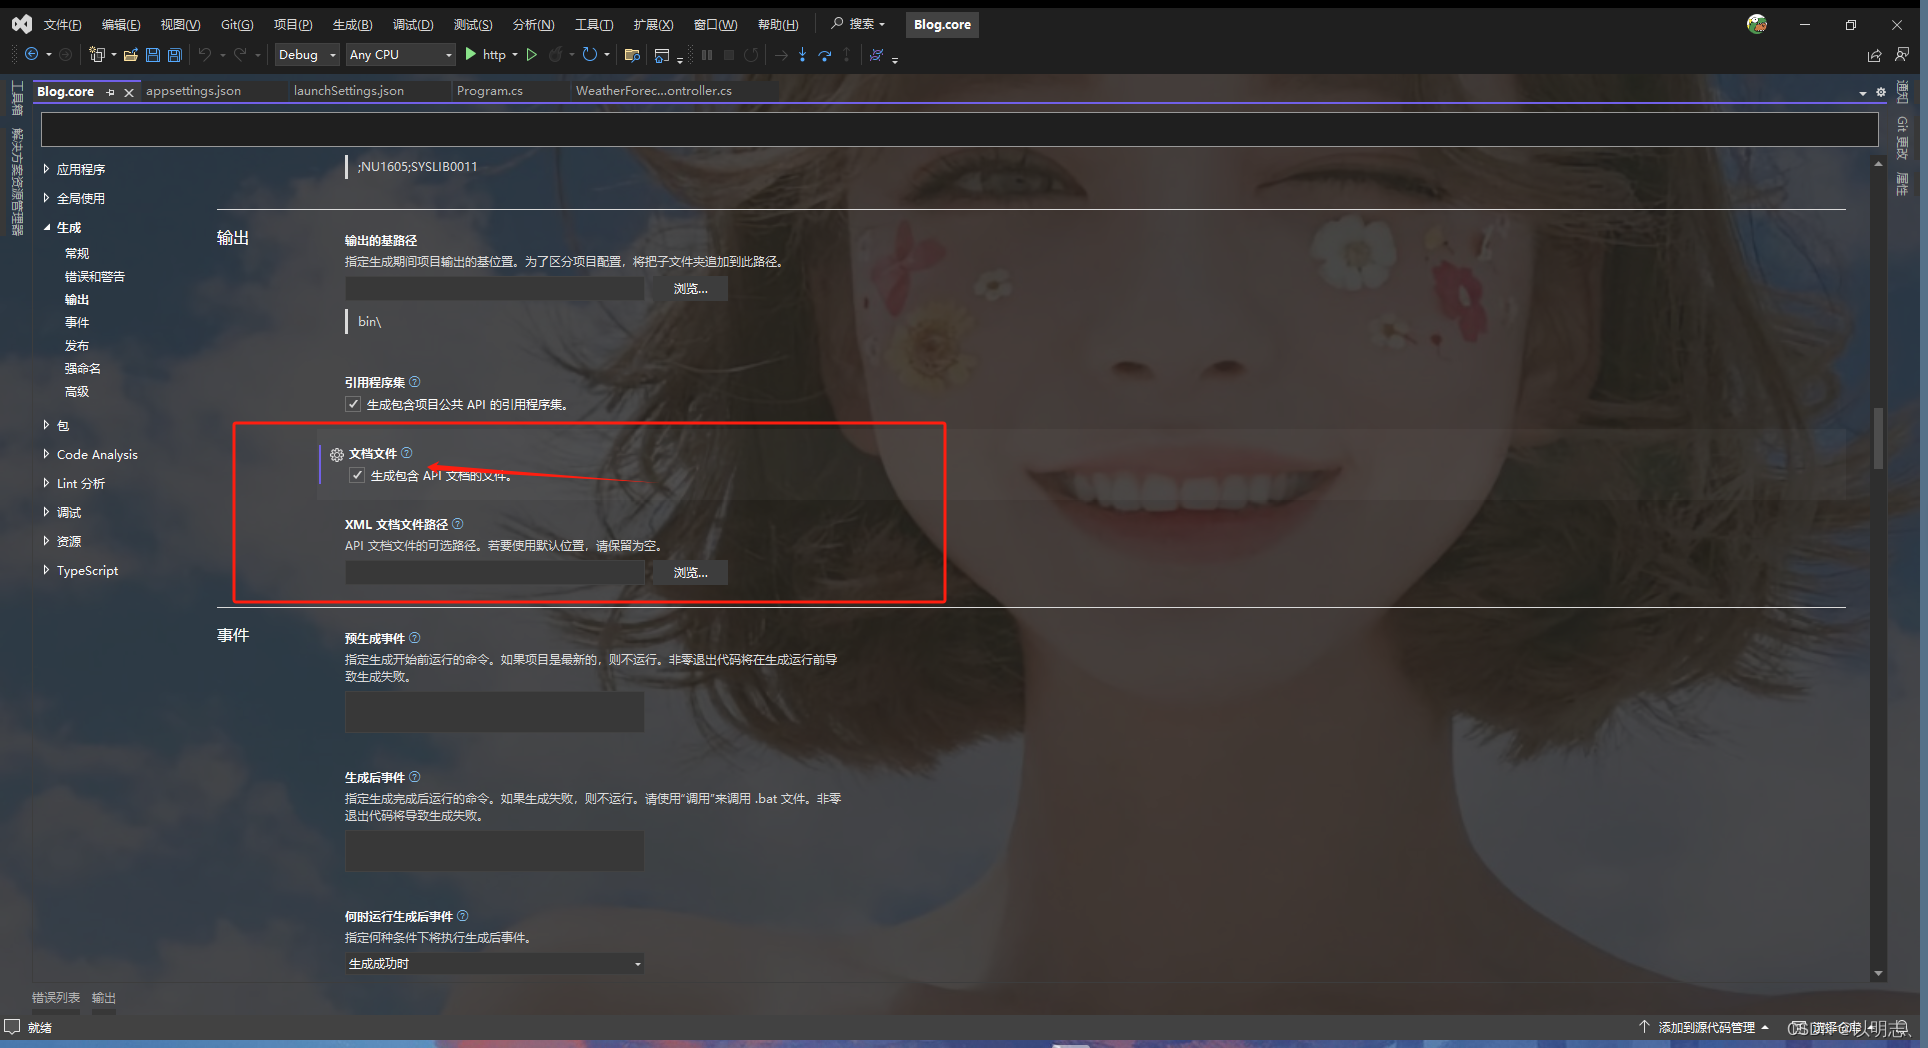
1、右击项目->选择属性->点击生成->输出,选中文档文件
2、配置服务
在program.cs 文件里配置SwaggerUI
//增加项一
builder.Services.AddSwaggerGen(c=> {
    c.SwaggerDoc("v1", new OpenApiInfo { Title = "Web API", Version = "v1" });
    var xmlFile = $"{Assembly.GetEntryAssembly().GetName().Name}.xml";
    var xmlPath = Path.Combine(AppContext.BaseDirectory, xmlFile);
    c.IncludeXmlComments(xmlPath);
});
//增加项二
if (app.Environment.IsDevelopment())
{
    app.UseSwagger();
    app.UseSwaggerUI(c =>
    {
        c.SwaggerEndpoint("/swagger/v1/swagger.json", "My API V1");
    });
}
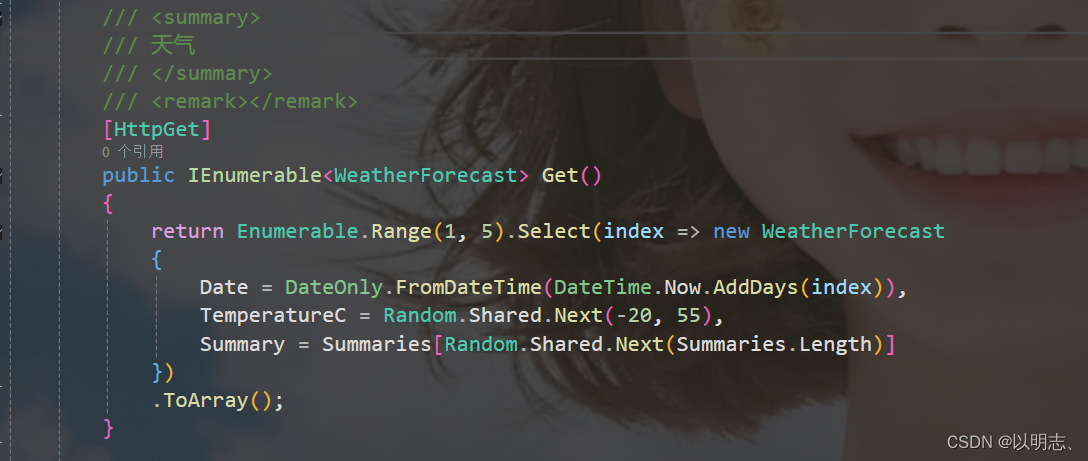
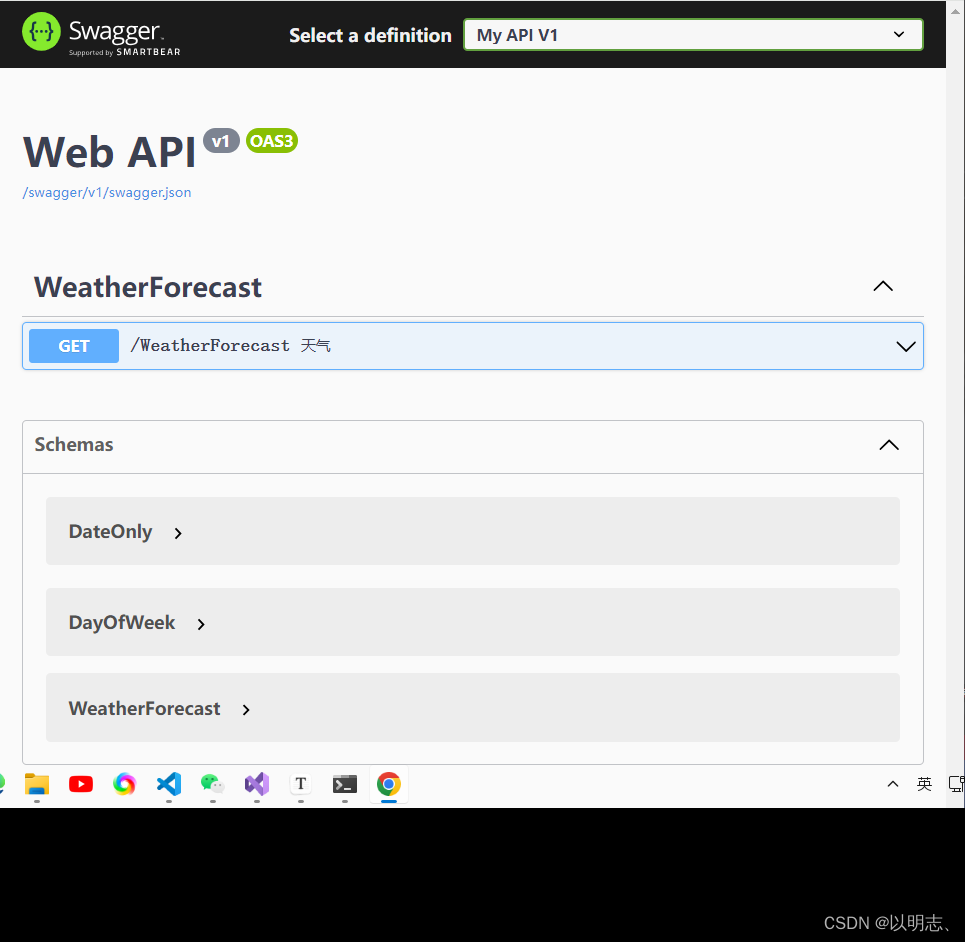
3、在控制器的方法上加上注释即可在swagger网页上看到注释
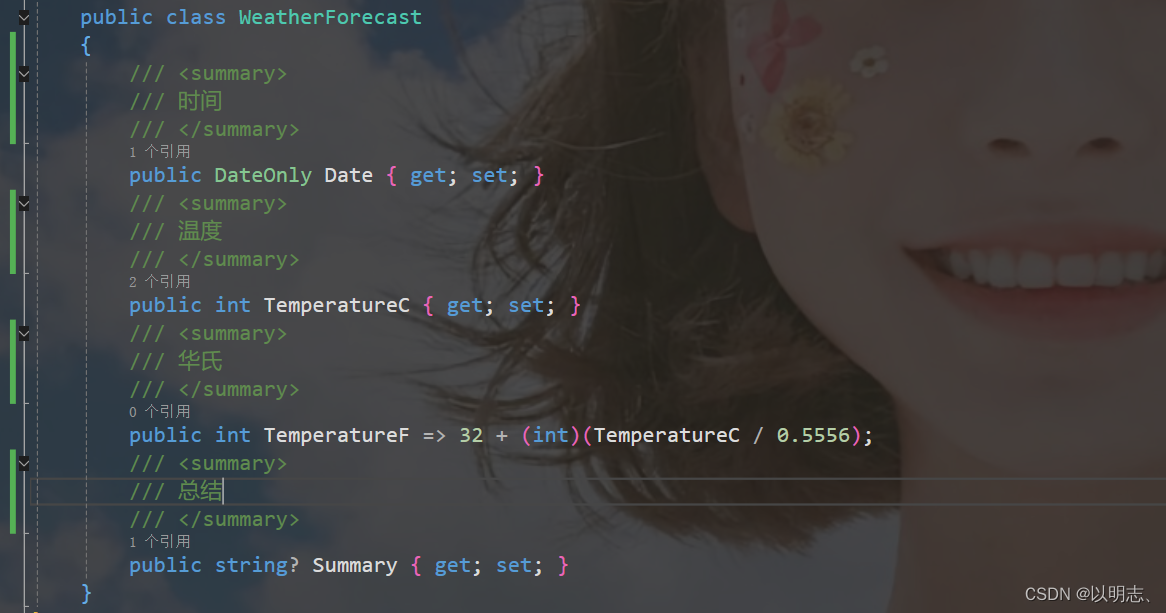
4、添加实体类的Swagger注释

JWT
1、解析
1)客户端向授权服务系统发起请求,申请获取“令牌”。
2)授权服务根据用户身份,生成一张专属“令牌”,并将该“令牌”以JWT规范返回给客户端
3)客户端将获取到的“令牌”放到http请求的headers中后,向主服务系统发起请求。主服务系统收到请求后会从headers中获取“令牌”,并从“令牌”中解析出该用户的身份权限,然后做出相应的处理(同意或拒绝返回资源)
2、配置JWT
1、添加NuGet包Microsoft.AspNetCore.Authentication.JwtBearer
2、在appsettings.json中添加JWT配置节点
   "JWT": {
    "SecKey": "Jamin1127!#@$%@%^^&*(~Czmjklneafguvioszb%yuv&*6WVDf5dw#5dfw6f5w6faW%FW^f5wa65f^AWf56", //密钥
    "Issuer": "Jamin",  //发行者
    "ExpireSeconds": 7200 //过期时间
  }
3、在Program类里进行服务注册
#region JWT服务
// 注册JWT服务
builder.Services.AddSingleton(new JwtHelper(builder.Configuration));
builder.Services.AddAuthentication( JwtBearerDefaults.AuthenticationScheme).AddJwtBearer(options =>
{
    options.TokenValidationParameters = new TokenValidationParameters()
    {
        ValidateIssuer = true, //是否验证Issuer
        ValidIssuer = builder.Configuration["Jwt:Issuer"], //发行人Issuer
        ValidateAudience = false, //是否验证Audience
        ValidateIssuerSigningKey = true, //是否验证SecurityKey
        IssuerSigningKey = new SymmetricSecurityKey(Encoding.UTF8.GetBytes(builder.Configuration["Jwt:SecKey"])), //SecurityKey
        ValidateLifetime = true, //是否验证失效时间
        ClockSkew = TimeSpan.FromSeconds(30), //过期时间容错值,解决服务器端时间不同步问题(秒)
        RequireExpirationTime = true,
    };
}
);
builder.Services.AddAuthorization(options =>
{
/***    "Client" 策略要求用户必须拥有 "Client" 角色才能访问相关资源。
"Admin" 策略要求用户必须拥有 "Admin" 角色才能访问相关资源。
"SystemOrAdmin" 策略要求用户必须拥有 "Admin" 或者 "System" 角色之一才能访问相关资源。***/
    options.AddPolicy("Client", policy => policy.RequireRole("Client").Build());
    options.AddPolicy("Admin", policy => policy.RequireRole("Admin").Build());
    options.AddPolicy("SystemOrAdmin", policy => policy.RequireRole("Admin", "System"));
});
#endregion
//swagger里添加JWT授权
    builder.Services.AddSwaggerGen(c=> {
    c.SwaggerDoc("v1", new OpenApiInfo { Title = "Web API", Version = "v1" });
    //开启注释
    var xmlFile = $"{Assembly.GetEntryAssembly().GetName().Name}.xml";
    var xmlPath = Path.Combine(AppContext.BaseDirectory, xmlFile);
    c.IncludeXmlComments(xmlPath, true);
    // 配置 JWT Bearer 授权
    c.AddSecurityDefinition("Bearer", new OpenApiSecurityScheme
    {
        Description = "JWT Authorization header using the Bearer scheme",
        Name = "Authorization",
        In = ParameterLocation.Header,
        Type = SecuritySchemeType.Http,
        Scheme = "bearer"
    });
    var securityScheme = new OpenApiSecurityScheme
    {
        Reference = new OpenApiReference { Type = ReferenceType.SecurityScheme, Id = "Bearer" }
    };
    var securityRequirement = new OpenApiSecurityRequirement { { securityScheme, new string[] { } } };
    c.AddSecurityRequirement(securityRequirement);
});
//启用验证中间件
app.UseAuthentication();
app.UseAuthorization();
4、创建JWT类进行Token配置
using Microsoft.IdentityModel.Tokens;
using System.Diagnostics;
using System.IdentityModel.Tokens.Jwt;
using System.Security.Claims;
using System.Text;
namespace Blog.core.Common.Auth
{
    ///
    /// 授权JWT类
    ///
    public class JwtHelper
    {
        private readonly IConfiguration _configuration;
        ///
        /// Token配置
        ///
        ///
        public JwtHelper(IConfiguration configuration)
        {
            _configuration = configuration;
        }

        ///
        /// 创建Token 这里面可以保存自己想要的信息
        ///
        ///
        ///
        ///
        public string CreateToken(string username, string mobile)
        {
            try
            {
                // 1. 定义需要使用到的Claims
                var claims = new[]
                {
                    new Claim("username", username),
                    new Claim("mobile", mobile),
                    /* 可以保存自己想要信息,传参进来即可
                    new Claim("sex", "sex"),
                    new Claim("limit", "limit"),
                    new Claim("head_url", "xxxxx")
                    */
                };
                // 2. 从 appsettings.json 中读取SecretKey
                var secretKey = new SymmetricSecurityKey(Encoding.UTF8.GetBytes(_configuration["Jwt:SecKey"]));
                // 3. 选择加密算法
                var algorithm = SecurityAlgorithms.HmacSha256;
                // 4. 生成Credentials
                var signingCredentials = new SigningCredentials(secretKey, algorithm);
                // 5. 根据以上,生成token
                var jwtSecurityToken = new JwtSecurityToken(
                    _configuration["Jwt:Issuer"],    //Issuer
                    _configuration["Jwt:ExpireSeconds"],  //ExpireSeconds
                    claims,                          //Claims,
                    DateTime.Now,                    //notBefore
                    DateTime.Now.AddSeconds(30),     //expires
                    signingCredentials               //Credentials
                );
                // 6. 将token变为string
                var token = new JwtSecurityTokenHandler().WriteToken(jwtSecurityToken);
                return token;
            }
            catch (Exception)
            {
                throw;
            }

        }
        ///
        /// 获取信息
        ///
        ///
        ///
        public static string ReaderToken(string jwt)
        {
            var str = string.Empty;
            try
            {
                //获取Token的三种方式
                //第一种直接用JwtSecurityTokenHandler提供的read方法
                var jwtHander = new JwtSecurityTokenHandler();
                JwtSecurityToken jwtSecurityToken = jwtHander.ReadJwtToken(jwt);
                str = jwtSecurityToken.ToString();
            }
            catch (Exception ex)
            {
                Debug.WriteLine(ex.Message);
            }
            return str;
        }
        ///
        /// 解密jwt
        ///
        ///
        ///
        public string JwtDecrypt(string jwt)
        {

            StringBuilder sb = new StringBuilder();
            try
            {
                JwtSecurityTokenHandler tokenHandler = new();
                TokenValidationParameters valParam = new();
                var securityKey = new SymmetricSecurityKey(Encoding.UTF8.GetBytes(_configuration["Jwt:SecKey"]));
                valParam.IssuerSigningKey = securityKey;
                valParam.ValidateIssuer = false;
                valParam.ValidateAudience = false;
                //解密
                ClaimsPrincipal claimsPrincipal = tokenHandler.ValidateToken(jwt,
                        valParam, out SecurityToken secToken);
                foreach (var claim in claimsPrincipal.Claims)
                {
                    sb.Append($"{claim.Type}={claim.Value}");
                }
            }
            catch (Exception ex)
            {
                Debug.WriteLine(ex.Message);
            }
            return sb.ToString();
        }
    }
}
5、创建用户实体,进行用户密码的接收
using System.ComponentModel.DataAnnotations;
namespace Blog.core.Models
{
    public class UserInfo
    {
        ///
        /// 其中 [Required] 表示非空判断,其他自己研究百度
        ///
        [Required]
        public string UserName { get; set; }
        [Required]
        public string Password { get; set; }
        [Required]
        public string PhoneNumber { get; set; }
}
}
6、创建控制器,进行JWT的APi调用
using Blog.core.Common.Auth;
using Blog.core.Models;
using Microsoft.AspNetCore.Authorization;
using Microsoft.AspNetCore.Mvc;
namespace Blog.core.Controllers
{

        [Route("[controller]/[action]")]
        [ApiController]
        public class UserController : ControllerBase
        {
            private readonly JwtHelper _jwt;
            ///
            /// 初始化
            ///
            ///
            public UserController(JwtHelper jwtHelper)
            {
                _jwt = jwtHelper;
            }
            ///
            /// 获取Token
            ///
            ///
            [HttpPost]
            public IActionResult GetToken(UserInfo user)
            {
                //参数验证等等....
                if (string.IsNullOrEmpty(user.UserName))
                {
                    return Ok("参数异常!");
                }
                //这里可以连接mysql数据库做账号密码验证
                //这里可以做Redis缓存验证等等
                //这里获取Token,当然,这里也可以选择传结构体过去
                var token = _jwt.CreateToken(user.UserName, user.PhoneNumber);
                  //解密后的Token
                  var PWToken = _jwt.JwtDecrypt( token);
                  return Ok(token+"解密后:"+PWToken);

            }
            ///
            /// 获取自己的详细信息,其中 [Authorize] 就表示要带Token才行
            ///
            ///
            [HttpPost]
            [Authorize]
            public IActionResult GetSelfInfo()
            {
                //执行到这里,就表示已经验证授权通过了
                /*
                 * 这里返回个人信息有两种方式
                 * 第一种:从Header中的Token信息反向解析出用户账号,再从数据库中查找返回
                 * 第二种:从Header中的Token信息反向解析出用户账号信息直接返回,当然,在前面创建        Token时,要保存进使用到的Claims中。
                */
                return Ok("授权通过了!");
            }
        }
}
7、用来验证权限的控制器
using Microsoft.AspNetCore.Authorization;
using Microsoft.AspNetCore.Mvc;
namespace Blog.core.Controllers
{

    [ApiController]
    [Route("[controller]")]
    [Authorize(Roles ="Admin")]
    [Authorize(Roles ="User")]//增加权限验证
    public class WeatherForecastController : ControllerBase
    {
        private static readonly string[] Summaries = new[]
        {
            "Freezing", "Bracing", "Chilly", "Cool", "Mild", "Warm", "Balmy", "Hot", "Sweltering", "Scorching"
        };
        private readonly ILogger _logger;
        public WeatherForecastController(ILogger logger)
        {
            _logger = logger;
        }
        ///
        /// 天气
        ///
        ///
        [HttpGet]
        public IEnumerable Get()
        {
            return Enumerable.Range(1, 5).Select(index => new WeatherForecast
            {
                Date = DateOnly.FromDateTime(DateTime.Now.AddDays(index)),
                TemperatureC = Random.Shared.Next(-20, 55),
                Summary = Summaries[Random.Shared.Next(Summaries.Length)]
            })
            .ToArray();
        }

    }
}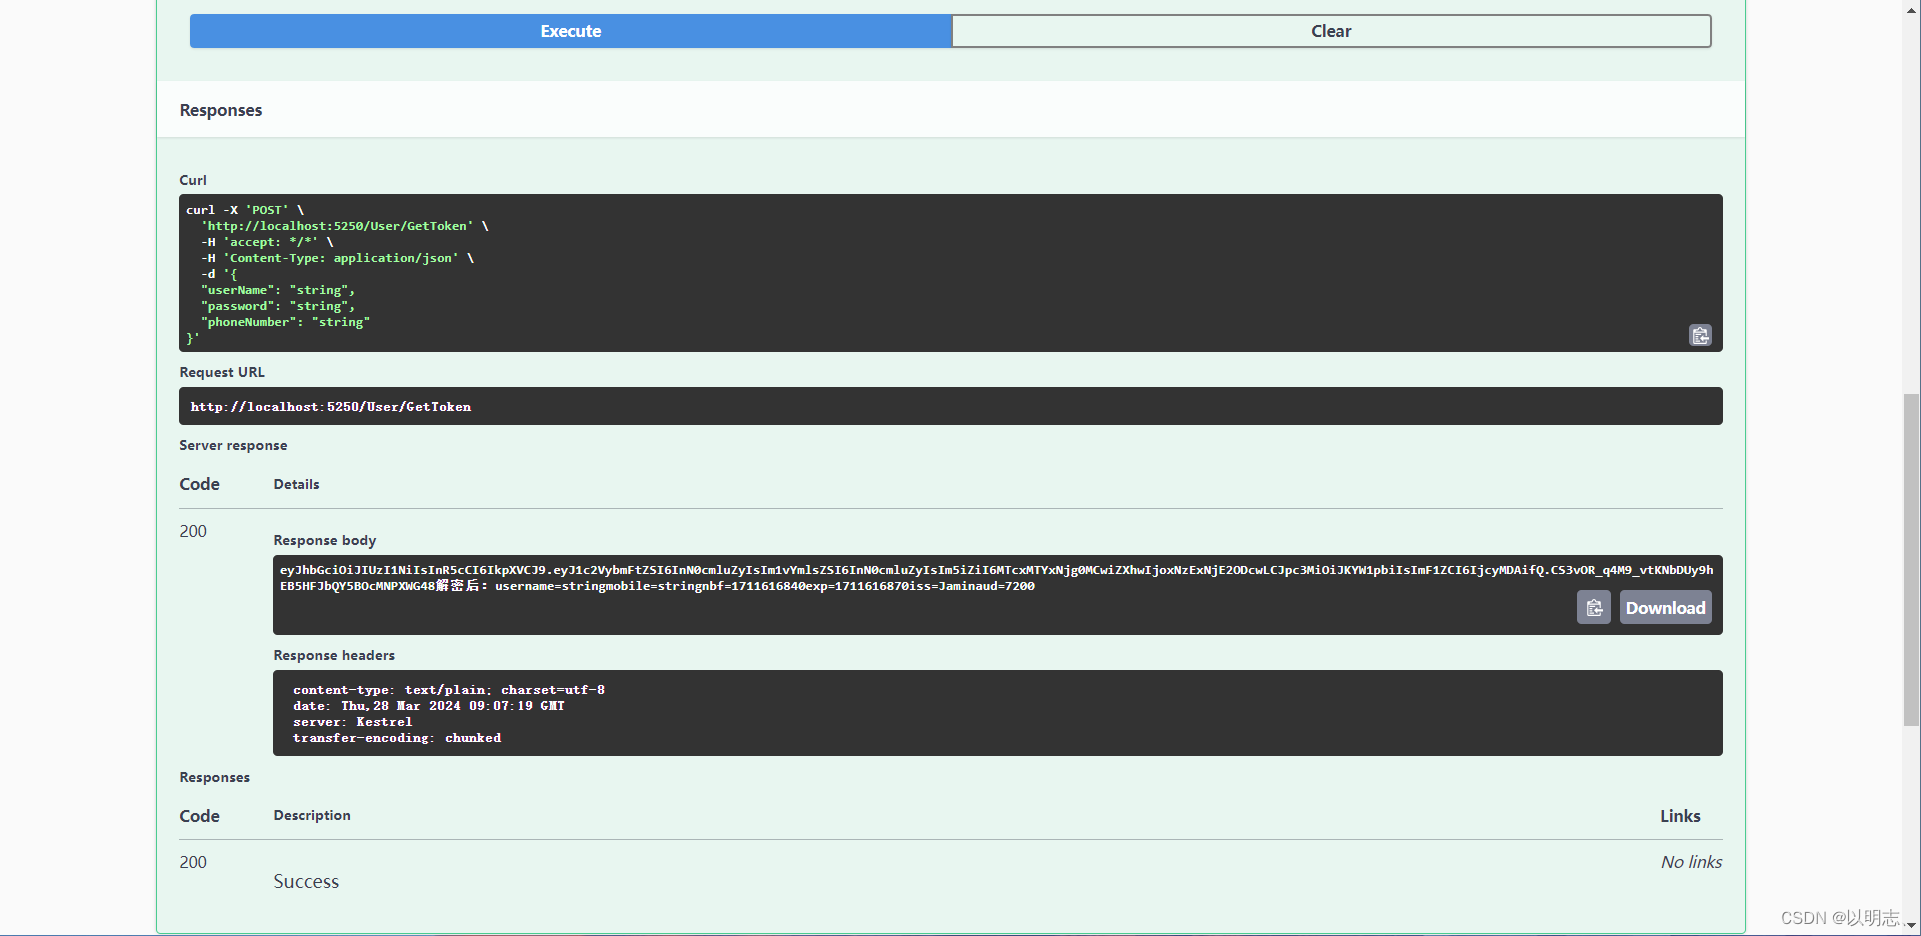
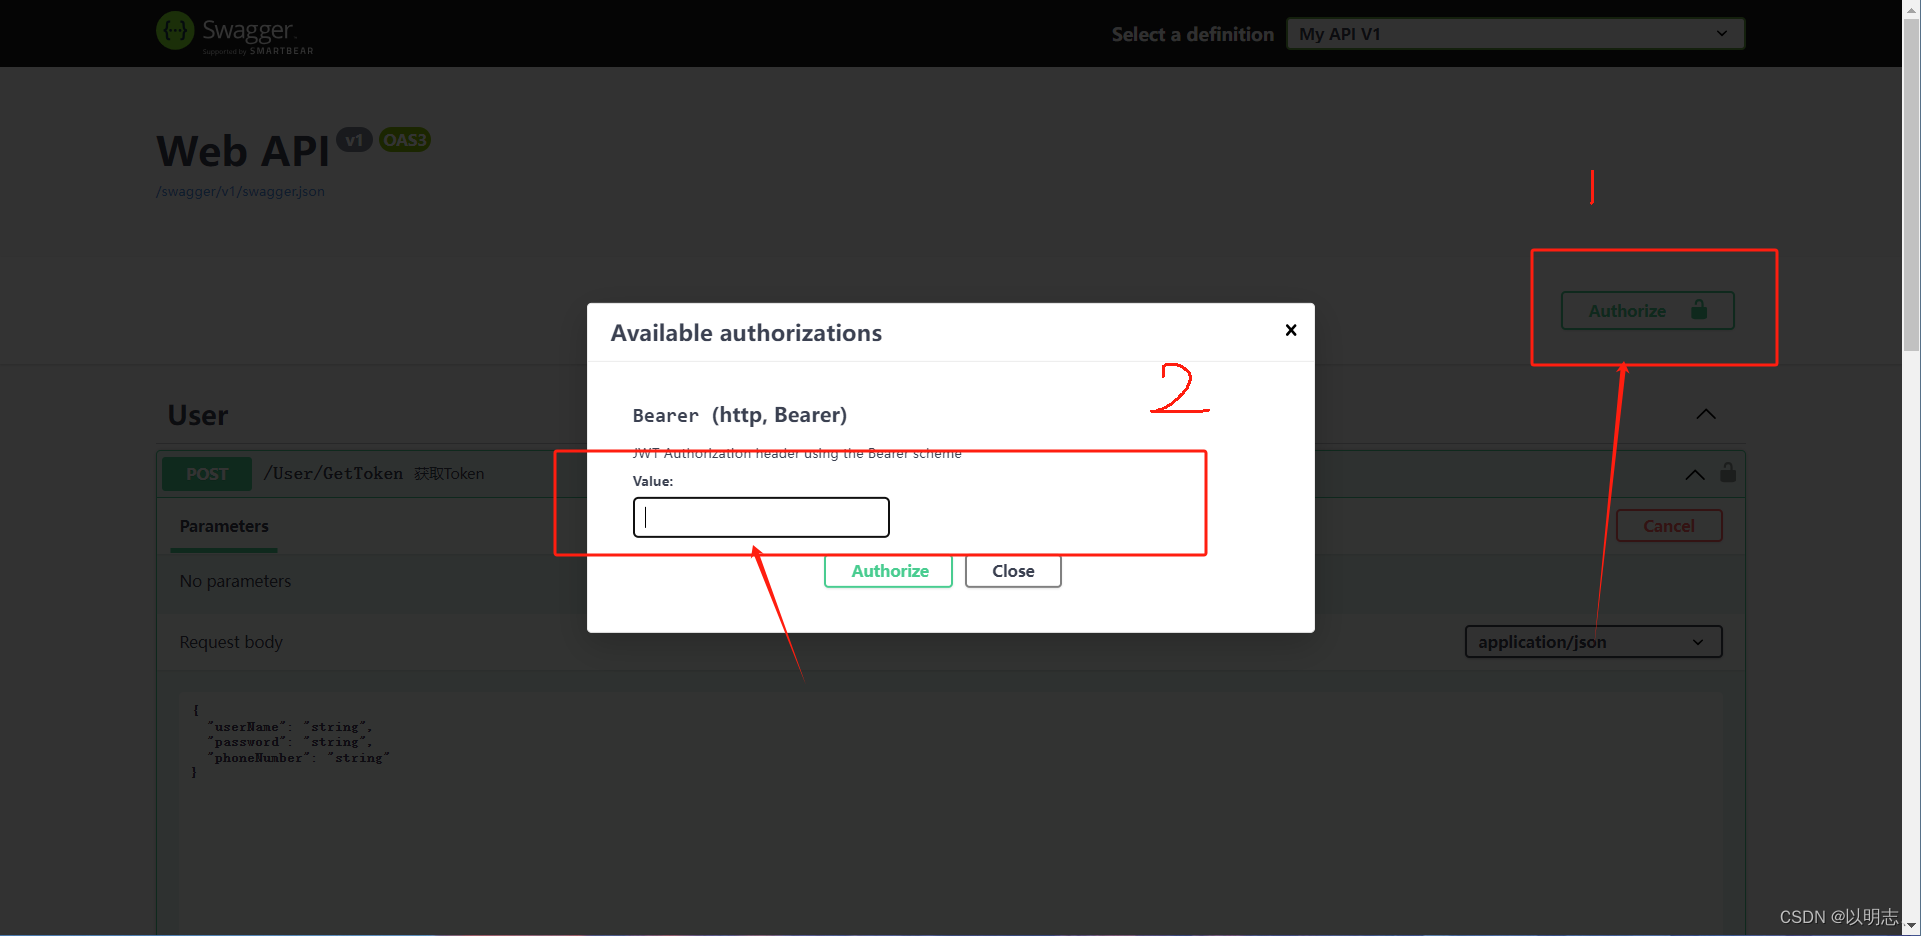
**注:获取Token后在Swagger上输入token的value就可以进行接口的调用了 **
配置SqlSugar
0、引入SqlSugarCore包
1、编写Context类
  public static SqlSugarClient db = new SqlSugarClient(
                  new ConnectionConfig()
                  {
                      ConnectionString = "server = 127.0.0.1; Database = test; Uid = root; Pwd = root; AllowLoadLocalInfile = true;",
                      DbType = DbType.MySql,//设置数据库类型
                      IsAutoCloseConnection = true,//自动释放数据务,如果存在事务,在事务结束后释放
                  });
2、配置实体类
using SqlSugar;
using System;
using System.Collections.Generic;
using System.Linq;
using System.Text;
using System.Threading.Tasks;
namespace Blog.Core.Model.Models
{
    [SugarTable(tableName: "Person")]
    public class User
    {
        [SugarColumn(IsPrimaryKey = true, IsIdentity = true)]
        public int Id { get; set; }
        public int Age { get; set; }
        public string? Name { get; set; }
    }
}
3、创建Service服务类进行数据库的CRUD
using Blog.core.IRepository;
using Blog.Core.Model.Models;
using static Blog.Core.Common.DbContext;
namespace Blog.Core.Repository
{
    public class UserRepository : IUserRepository
    {
        public  int Add(User user)
        {
            var line = db.Insertable(user).ExecuteCommand();
            return line;
        }
        public int Delete(int UserId)
        {
            var line = db.Deleteable(new User
            {
                Id = UserId
            }).ExecuteCommand();
            return line;
        }
        public List GetUsers(int Id)
        {
            List users;
            if (Id is not 0)
            {
                users = db.Queryable().Where(it => it.Id == Id).ToList();
            }
            else
            {
                users = db.Queryable().ToList();
            }
            return users;
        }
        public int Update(User user)
        {
            var res = db.Updateable(user).ExecuteCommand();
            return res;
        }
    }
}
4、配置Controller进行路由
using Blog.core.Models;
using Blog.Core.Auth;
using Blog.Core.IServices;
using Blog.Core.Model.Models;
using Microsoft.AspNetCore.Authorization;
using Microsoft.AspNetCore.Mvc;
using Blog.Core.Services;
namespace Blog.core.Controllers
{
    [Route("[controller]/[action]")]
        [ApiController]
        public class UserController : ControllerBase
        {
            private readonly IUserService _userService;
            public UserController( IUserService userService)
                {
                    _userService = userService;
                }
                ///
                /// 增加
                ///
                ///
                ///
                [HttpPost]
                public int AddUser(User user)
                {
                    // User user = new User() { Id = 2024325, Name = "Czm", Age = 20 };
                    return _userService.Add(user);
                }
                ///
                /// 删除
                ///
                ///
                ///
                [HttpDelete]
                public int DeleteUser(int id)
                {
                    return _userService.Delete(id);
                }
                ///
                /// 更新
                ///
                ///
                ///
                [HttpPut]
                public int UpdateUsre(User user)
                {
                    return _userService.Update(user);
                }
                ///
                /// 获取数据
                ///
                ///
                ///
                [HttpGet]
                public List GetUser(int id)
                {
                    return _userService.GetUsers(id);
                }
    }
}
依赖注入与IOC
IOC
IOC 是 Inversion of Control(控制反转)的缩写。在软件开发中,IOC 是一种设计模式,它改变了传统的程序设计流程,使得对象之间的依赖关系由代码本身控制变为由外部容器控制。
而采用IOC 设计模式后,对象之间的依赖关系由外部容器来管理和注入,对象本身不需要关心依赖的具体实现,只需要定义自己的接口或抽象类,并在外部容器中配置依赖关系。这样可以降低代码的耦合度,提高代码的灵活性、可维护性和可扩展性。
常见的IOC 容器包括 Spring Framework 中的 Spring IoC ,dotnet中的autofoc,它通过依赖注入(Dependency Injection)的方式来实现控制反转。通过IOC 容器,可以将对象之间的依赖关系集中管理,实现了代码的松耦合,使得程序更易于理解、扩展和维护。
依赖注入DI
1、继承接口并实现构造方法
 public class UserService : IUserService
 {
     private  IUserRepository _userService ;
     public UserService(IUserRepository userService)
     {
         _userService = userService;
     }
 }
2、在program里加上
builder.Services.AddTransient();
builder.Services.AddTransient();
.net提供了三种生命周期的容器
builder.Services.AddTransient(); builder.Services.AddScoped(); builder.Services.AddSingleton();
- 暂时性对象始终不同。 IndexModel 和中间件中的临时 OperationId 值不同。
- 范围内对象对给定请求而言是相同的,但在每个新请求之间不同。
- 单一实例对象对于每个请求是相同的。
3、Controller层使用
 public class UserController : ControllerBase
 {
     private readonly IUserService _userService ;
     public UserController(IUserService userService)
     {
         _userService = userService;
     }
 }
Autofac轻量容器的使用
1、安装Nuget包Autofac.Extensions.DependencyInjection和Autofac.Extras.DynamicProxy
2、使用程序集注册,通过Model注册(这里只列这一种Auto官方文档Assembly Scanning — Autofac 7.0.0 documentation)
**创建Model类 **
using Autofac;
using Blog.Core.IServices;
using Microsoft.AspNetCore.Mvc;
using Microsoft.Extensions.DependencyModel;
using System.Reflection;
using System.Runtime.Loader;
namespace Blog.Core.Configuration.AutoModule
{
    public class ServiceModel: Autofac.Module
    {
        protected override void Load(ContainerBuilder builder)
        {
            // 自动对集成 IDependency 接口的类进行注册
            Type baseType = typeof(IUserService);
            var compilationLibrary = DependencyContext.Default.CompileLibraries.Where(x => !x.Serviceable && x.Type == "project").ToList();
            List assemblyList = new List();
            foreach (var _compilation in compilationLibrary)
            {
                try
                {
                    assemblyList.Add(AssemblyLoadContext.Default.LoadFromAssemblyName(new AssemblyName(_compilation.Name)));
                }
                catch (Exception ex)
                {
                    Console.WriteLine(_compilation.Name + ex.Message);
                }
            }
            builder.RegisterAssemblyTypes(assemblyList.ToArray()).Where(type => baseType.IsAssignableFrom(type) && !type.IsAbstract)
                .AsSelf()
                .AsImplementedInterfaces()
                .PropertiesAutowired()
                .InstancePerLifetimeScope();
            var controllersTypesInAssembly = typeof(Program).Assembly.GetExportedTypes()
                .Where(type => typeof(ControllerBase).IsAssignableFrom(type)).ToArray();
            builder.RegisterTypes(controllersTypesInAssembly).PropertiesAutowired();
        }
    }
}
**在program.cs中解析Model **
builder.Host.UseServiceProviderFactory(new AutofacServiceProviderFactory());
builder.Host.ConfigureContainer(i => i.RegisterModule());
builder.Services.AddControllers().AddControllersAsServices();
在Controller中使用
public class UserController : ControllerBase
{
    private readonly IUserService _userService ;
    public UserController(IUserService userService)
    {
        _userService = userService;
    }
}
使用Autofac完成AOP日志
1、编写AOP类
using Castle.DynamicProxy;
using Newtonsoft.Json;
using StackExchange.Profiling;
using System.Reflection;
namespace Blog.Core.AOP
{
    ///
    /// 拦截器BlogLogAOP 继承IInterceptor接口
    ///
    public class BlogLogAOP : IInterceptor
    {
        ///
        /// 实例化IInterceptor唯一方法
        ///
        /// 包含被拦截方法的信息
        public void Intercept(IInvocation invocation)
        {
            string UserName = "Jamin";
            //记录被拦截方法信息的日志信息
            var dataIntercept = "" +
                $"【当前操作用户】:{UserName} \r\n" +
                $"【当前执行方法】:{invocation.Method.Name} \r\n" +
                $"【携带的参数有】: {string.Join(", ", invocation.Arguments.Select(a => (a ?? "").ToString()).ToArray())} \r\n";
            try
            {
                MiniProfiler.Current.Step($"执行Service方法:{invocation.Method.Name}() -> ");
                //在被拦截的方法执行完毕后 继续执行当前方法,注意是被拦截的是异步的
                invocation.Proceed();
                // 异步获取异常,先执行
                if (IsAsyncMethod(invocation.Method))
                {
                    //Wait task execution and modify return value
                    if (invocation.Method.ReturnType == typeof(Task))
                    {
                        invocation.ReturnValue = InternalAsyncHelper.AwaitTaskWithPostActionAndFinally(
                            (Task)invocation.ReturnValue,
                            ex =>
                            {
                                LogEx(ex, ref dataIntercept);
                            });
                    }
                    else //Task
                    {
                        invocation.ReturnValue = InternalAsyncHelper.CallAwaitTaskWithPostActionAndFinallyAndGetResult(
                         invocation.Method.ReturnType.GenericTypeArguments[0],
                         invocation.ReturnValue,
                         ex =>
                         {
                             LogEx(ex, ref dataIntercept);
                         });
                    }
                }
                else
                {// 同步1

                }
            }
            catch (Exception ex)// 同步2
            {
                LogEx(ex, ref dataIntercept);
            }
            var type = invocation.Method.ReturnType;
            if (typeof(Task).IsAssignableFrom(type))
            {
                var resultProperty = type.GetProperty("Result");
                dataIntercept += ($"【执行完成结果】:{JsonConvert.SerializeObject(resultProperty.GetValue(invocation.ReturnValue))}");
            }
            else
            {
                dataIntercept += ($"【执行完成结果】:{invocation.ReturnValue}");
            }
            // 你的日志记录 比如log4
            #region 输出到当前项目日志
            var path = Directory.GetCurrentDirectory() + @"\Log";
            if (!Directory.Exists(path))
            {
                Directory.CreateDirectory(path);
            }
            string fileName = path + $@"\InterceptLog-{DateTime.Now.ToString("yyyyMMddHHmmss")}.log";
            StreamWriter sw = File.AppendText(fileName);
            sw.WriteLine(dataIntercept);
            sw.Close();
            #endregion
        }
        private void LogEx(Exception ex, ref string dataIntercept)
        {
            if (ex != null)
            {
                //执行的 service 中,收录异常
                MiniProfiler.Current.CustomTiming("Errors:", ex.Message);
                //执行的 service 中,捕获异常
                dataIntercept += ($"方法执行中出现异常:{ex.Message + ex.InnerException}\r\n");
            }
        }
        public static bool IsAsyncMethod(MethodInfo method)
        {
            return (
                method.ReturnType == typeof(Task) ||
                (method.ReturnType.IsGenericType && method.ReturnType.GetGenericTypeDefinition() == typeof(Task))
                );
        }
    }
    internal static class InternalAsyncHelper
    {
        public static async Task AwaitTaskWithPostActionAndFinally(Task actualReturnValue, Action finalAction)
        {
            Exception exception = null;
            try
            {
                await actualReturnValue;
            }
            catch (Exception ex)
            {
                exception = ex;
            }
            finally
            {
                finalAction(exception);
            }
        }
        public static async Task AwaitTaskWithPostActionAndFinallyAndGetResult(Task actualReturnValue, Func postAction, Action finalAction)
        {
            Exception exception = null;
            try
            {
                var result = await actualReturnValue;
                await postAction();
                return result;
            }
            catch (Exception ex)
            {
                exception = ex;
                throw;
            }
            finally
            {
                finalAction(exception);
            }
        }
        public static object CallAwaitTaskWithPostActionAndFinallyAndGetResult(Type taskReturnType, object actualReturnValue, Action finalAction)
        {
            return typeof(InternalAsyncHelper)
                .GetMethod("AwaitTaskWithPostActionAndFinallyAndGetResult", BindingFlags.Public | BindingFlags.Static)
                .MakeGenericMethod(taskReturnType)
                .Invoke(null, [actualReturnValue, finalAction]);
        }
    }
}
2、进行服务注册
builder.Host.UseServiceProviderFactory(new AutofacServiceProviderFactory());
builder.Host.ConfigureContainer(build =>
{
    // AOP
    var cacheType = new List();
    build.RegisterType();
    cacheType.Add(typeof(BlogLogAOP));
    // 获取 Service.dll 程序集服务,并注册
    var assemblysServices = Assembly.LoadFrom(servicesDllFile);
    build.RegisterAssemblyTypes(assemblysServices)
                .AsImplementedInterfaces()
                .InstancePerDependency()
                .EnableInterfaceInterceptors()//引用Autofac.Extras.DynamicProxy;
                .InterceptedBy(cacheType.ToArray());//允许将拦截器服务的列表分配给注册。
    // 获取 Repository.dll 程序集服务,并注册
    var assemblysRepository = Assembly.LoadFrom(repositoryDllFile);
    build.RegisterAssemblyTypes(assemblysRepository)
            .AsImplementedInterfaces()
            .InstancePerDependency();

});
Webapi的操作返回值和方法参数
返回值ActionResult
ASP.NET Core Web API中的操作方法的返回值如果是普通数据类型,那么返回值就会默认被序列化为JSON格式的响应报文体返回。
1  [HttpGet("{id}")]
2  public ActionResult GetPerson(int id)
3  {
4     if (id  user } from "@/store/Store";
const requestUrl = "http://localhost:5250";
const userStore = user();
//创建实例
const axiosInstance = axios.create({
  baseURL: requestUrl,
  // timeout: 3000,
});
//请求拦截器,请求前
axiosInstance.interceptors.request.use(
  (config) = {
    if (userStore.data) {
      // console.log("请求头toekn=====>", userStore.data.token);
      // 设置请求头
      // config.headers['token'] = useToken.token;
      config.headers.Authorization = `Bearer ${userStore.data.token}`;
    }
    return config;
  },
  (error) => {
    return Promise.reject(error);
  }
);
//请求拦截器,请求后
axiosInstance.interceptors.response.use(
  (response) => {
    if (response.status === 200) return response.data;
  },
  (error) => {
    console.log(error);
    const status: number = error.response.status;
    switch (status) {
      case 404:
        console.error("资源不存在");
        break;
      case 401:
        console.error("没有权限");
        break;
      case 500:
      case 501:
      case 502:
        console.error("没有权限");
        break;
      case 400:
        console.error(error.response.data.msg + "参数错误");
        break;
      default:
        console.log("无法识别");
        break;
    }
    return Promise.reject(error);
  }
);
interface ActionResult {
  data: T;
  msg: string;
  error: any;
  code: number;
}
//get请求
export const get = (
  url: string,
  params?: Object
): Promise => {
  return axiosInstance.get(url, { params });
};
//post请求
export const post = (
  url: string,
  data?: Object
): Promise => {
  return axiosInstance.post(url, data);
};
//put请求
export const put = (
  url: string,
  data?: Object
): Promise => {
  return axiosInstance.put(url, data);
};
//delete请求
export const delete1 = (
  url: string,
  params?: Object
): Promise => {
  return axiosInstance.delete(url, { params });
};
封装api接口调用方法
import { get, post, delete1, put } from "./request";
import { user } from "@/types/index";
export const loginApi = (data: user) => {
  return post("/api/Login/login", data);
};
export const getUserInfo = (ID: string) => {
  return get("/api/Index/UserInfo", { ID });
};
在页面中调用api
import { loginApi } from "@/common/api";
const emailLoginApi = async () => {
  phoneLoding.value = true;
  try {
    const res = await loginApi({
      EMAIL: emailNumber.value,
      PASSWORD: PassWard.value,
    });
    // localStorage.setItem("userInfo", JSON.stringify(res.data.token));
    // Cookies.set("token", res.data.token);
    console.log(res);
    userStore.setData(res.data);
    console.log(userStore.data);
    $router.push("/index");
    phoneLoding.value = false;
  } catch (error) {
    phoneLoding.value = false;
  }
};
pinia使用
使用npm下载pinia
npm i pinia
创建Store文件进行状态存储
import { defineStore } from "pinia";
export const user = defineStore("userInfo", {
  state: () => ({
    data: { id: "", Name: "", token: "", Email: "" },
  }),
  actions: {
    setData(payload: any) {
      this.data = payload;
    },
  },
});
在页面组件中实例化状态并赋值
import { user } from "@/store/Store";
const userStore = user(); // 实例化 store
userStore.setData(res.data);


还没有评论,来说两句吧...