温馨提示:这篇文章已超过428天没有更新,请注意相关的内容是否还可用!
摘要:Android原生恢复出场设置流程包括几个步骤。用户需要进入设备的设置菜单。找到“备份和重置”或“恢复出厂设置”选项。点击后,系统会提示用户确认是否真的要重置设备,确认后设备会开始清除所有数据并恢复到出厂状态。在此过程中,用户需要注意备份重要数据以防丢失。整个过程可能需要一些时间来完成,取决于设备的性能和数据的量。
前言
本篇将介绍 Android 恢复出场设置功能。前段时间同事分享了关于 Android 恢复出场设置及清除数据的相关知识点,现将相关知识点记录保存,以备学习。感谢 @同事 的细心总结~~~
正文
1、概述
首先我们来简单说一下 Master Reset 的流程,或者说这个原生功能在执行过程中有哪些部分参与。
从触发开始,Android 的 Settings 中基本会有 恢复出场设置/清除数据 的功能,可以从 Settings 中触发相关功能;但是实际功能实现并不是 Settings 实现的,在系统中有一个 MasterClearReceiver 广播接收器,Settings 的工作是当用户按下相关功能按键后,Settings 会发出相关的广播,广播在流转中被系统中的 MasterClearReceiver 接收到,从而继续具体的功能。当 MasterClearReceiver 接收到功能指令广播后,会跟 RecoverySystem 通信,在 RecoverySystemService 中经过一系列配置后,通过 PowerManager 的 重启函数进行整机的重启,重启后会进入 Recovery 模式,进行具体的 恢复出厂设置/清除数据 的工作,完成后重新引导系统,切回到主系统运行。
上面是简要描述下 恢复出场设置 的流程,可以发现实际完成 恢复出场设置/清除数据 的工作实际是 Recovery 模式下完成的,主系统在进入 Recovery 前会保存相关指令,在启动时与 Recovery 通信,执行对应的指令。下面我们将会现介绍一下 Recovery 模式相关知识,然后会从恢复出场设置的流程开始介绍整体的功能流转以及具体完成了哪些操作。
2、Recovery 模式
Recovery 是 Android 手机备份功能,指的是一种可以对安卓手机内部的数据或系统进行修改的模式。在这个模式下可以,对已有的系统进行备份或升级,也可以在此恢复出厂设置。
2.1 Recovery 模块功能
Recovery 模式的主要两个功能如下:
恢复出厂设置
升级
2.2 Recovery 模式工作原理
2.2.1 Recovery 启动
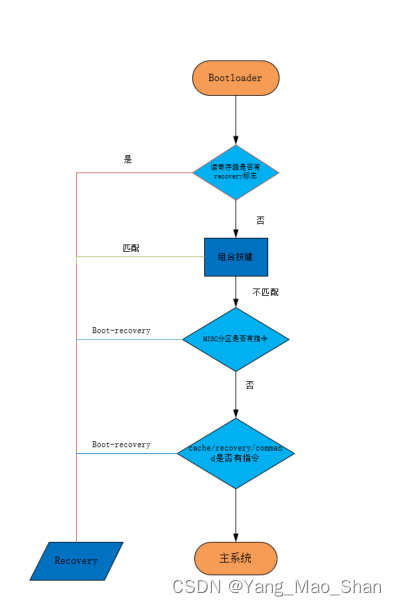
下图是系统进入 recovery 的流程图:

如上图,所描绘的分别是3条进入 recovery 模式的路径:
读取寄存器中的 recovery 标志
组合按键
对 misc 分区和 cache 分区写入指令
2.2.1.1 读取寄存器中的 recovery 标志
此情形有两种方式触发:adb reboot recovery 和 Powermanager.reboot(…,“recovery”,…)
先看通过 Powermanager 方式进入recovery,powermanager 调用 reboot() 函数,最终往寄存器中写入了一个 recovery 标志,在机器重启时在 BootLoader 中读取该标志,然后进入到 recovery 模式,与adb reboot recovery 方式类似,两者都是通过修改 sys.powerctl 的值来达到目的
2.2.1.2 组合按键
组合按键的方式比较简单,在机器重启进入 BootLoader 时,会先检查寄存器中的 recovery 标志,如果没有标志则会检测组合按键是否按下,如果按下则选择进入 recovery 模式。
2.2.1.3 MSIC 和 CACHE 分区指令进入
此方法一般 root 模式可手动修改 CACHE 分区,还有手机设置中的恢复出厂设置是通过这种方式进入的
2.2.2 Recovery 模式介绍
若启动过程中用户没有按下不论什么组合键。bootloader 会读取位于 MISC 分区的启动控制信息块 BCB(Bootloader Control Block)。它是一个结构体。存放着启动命令 command。依据不同的命令。系统又能够进入三种不同的启动模式:MainSystem、Recovery、Bootloader。
具体过程如下:
- 设备开机,Bootloader 首先执行硬件初始化。
- 如果用户没有按键输入,Bootloader 会继续正常启动流程。
- Bootloader 会读取 MISC 分区中的 BCB 块。BCB 中包含 Bootloader 控制信息,如 Recovery 消息、OTA 更新状态等。
- 根据 BCB 中的信息,Bootloader 判断下一步操作。比如启用 Recovery 模式或直接引导启动 Main System。
- 最后 Bootloader 按照 BCB 决定的操作继续启动过程。
Recovery 的工作须要整个软件平台的配合,从通信架构上来看。主要有三个部分。
MainSystem:Main System 是 Android 的正常工作模式,对应的是 boot.img。
- 在正常启动时(BCB中无其他命令),Bootloader 会用 boot.img 启动进入 Main System。
- Main System 中,系统更新是通过 OTA 或者 update.zip 包完成的。
- 在更新重启前,Main System 会向 MISC 分区的 BCB 中写入命令。
- 该命令用于通知 Bootloader,下次启动需要进入 Recovery 模式而不是 Main System。
- 这样在重启后,Bootloader 就可以根据 BCB 中的命令启动进入 Recovery 模式来完成更新流程。
Recovery:系统进入 Recovery 模式后会装载 Recovery 分区。该分区包括 recovery.img(同 boot.img 同样。包括了标准的内核和根文件系统)。进入该模式后主要是执行 Recovery 服务(/sbin/recovery)来做对应的操作(重新启动、升级 update.zip、擦除 cache 分区等)。
Bootloader:除了正常的载入启动系统之外。还会通过读取 MISC 分区(BCB)获得来自 Main system 和 Recovery 的消息。
- 来自 Recovery 的消息:如系统更新、恢复出厂设置等操作的状态消息。
- 来自 Main System 的消息:如 OTA 更新结果、恢复出厂设置结果等信息。
Bootloader 会在启动前读取 MISC 分区中的消息,根据消息进行相应的操作,如跳转到 Recovery 模式等。
2.2.3 三个部分相互之间如何通信?
2.2.3.1 主系统和 Recovery 之间 通过 /cache/recovery 通信
Recovery 通过 /cache/recovery/ 文件夹下的 3 个文件与 mian system 通信:
/cache/recovery 文件夹下有3个功能文件:
1.  /cache/recovery/command 用于传递主系统的指令
2.  /cache/recovery/log 保存 recovery 模式运行时产生的 log
3.  /cache/recovery/last_log 保存上次 Recovery 会话的日志,供参考
/cache/recovery/command支持的指令有(一行一个指令 '\n’结尾):
--update_package=path  验证安装 OTA 包,OTA 升级使用
--wipe_data    清除用户数据(cache分区),然后重启
--prompt_and_wipe_data 提示用户数据已损坏,征得用户同意后擦除用户数据(和缓存),然后重新启动
--wipe_cache  清除 cache 分区(但是不包含用户数据),然后重启
--set_encrypted_filesystem=on|off   启用/禁用加密的文件系统
--just_exit  不做操作,直接退出,重启
2.2.3.2、BootLoader 与 recovery 通过 BCB(BootLoader Control Block)通信
BCB 不仅是 BootLoader 与 recovery 之间的通信桥梁,更是 BootLoader 与 main system 之间的通信桥梁,从而变成了 recovery 与 main system 之间的通信方式,目前最新 android 系统中对于 /cache/recovery 已经用的很少,主要是使用 BCB 实现 recovery 与 main system 之间的信息交换。存储在 flash 中的 MISC 分区。其本身就是一个 struct bootloader_message 结构体,MISC 分区使用空间分配如下:
0k - 2k 用于 bootloader_message
2k - 16k 用于 BootLoader(2K-4K范围可以选择性地用作 bootloader_message_ab结构体)
16K - 64K 由 uncrypt 和 recovery 用于存储 A/B 设备的 wipe_package
bootloader_message结构定义如下:
struct bootloader_message {
    char command[32];
    char status[32];
    char recovery[768];
    char stage[32];
    char reserved[1184];
};
command:当需要重新启动进入 recovery 模式或者更新 bootloaader 固件时,linux 会去更新这个值。当固件更新完毕后,bootloader 也会更新这个值。另外在成功更新后结束 Recovery 时。会清除这个成员的值,防止重新启动时再次进入 Recovery 模式。
status: 在完毕对应的更新后。Bootloader 会将运行结果写入到这个字段。
recovery: 可被 Main System 写入,也可被 Recovery 服务程序写入。该文件的内容格式为:
        “recovery\n
         \n
         ”
就是一个字符串,必须以 recovery\n 开头,否则这个字段的所有内容域会被忽略。同时每条指令都是以“\n”结尾,每条指令各占一行。
“recovery\n” 之后的部分,是 /cache/recovery/command 支持的命令。可以将其理解为 Recovery 操作过程中对命令操作的备份。
Recovery 操作过程为:先读取 BCB 然后读取 /cache/recovery/command,然后将二者重新写回 BCB,这样在进入 Main system 之前,确保操作被执行。
在操作之后进入 Main system 之前,Recovery 又会清空 BCB 的 command 域和 recovery 域,这样确保重启后不再进入 Recovery 模式。
2.3 Recovery 流程
recovery 模式相对于 main system 来说其实就是一个微型系统,没有主系统那么复杂,只负责简单的功能和绘制简单的界面,并且代码逻辑也相对简单,容易理解。主要逻辑放在 recovery.cpp 中实现,我们来看下它主要做了什么:
- 初始化并加载 RECOVERY 环境变量。
- 加载 recovery 命令配置文件 recovery.fstab。
- 初始化界面绘制、输入事件等。- 根据命令配置文件挂载分区。
- 解析 Recovery 命令并执行,如 wipe 数据、安装 update 包等。
- 显示日志输出。
- 完成操作后重新引导系统。
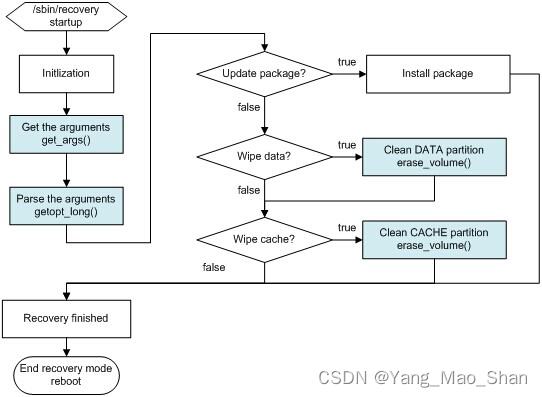
大体代码流程图如下

比较重要的两个函数 get_args()、getopt_long()
get_args() 作为对外接口,内部调用 getopt_long() 实现命令行解析
getopt_long():
- 根据事先定义的选项规则,解析命令行参数,返回对应选项的 key。
- 不直接处理选项参数,只返回选项 key。
get_args():
- 调用 getopt_long() 解析命令行选项。
- 根据 getopt_long() 返回的选项 key,进一步处理选项的参数。
- 如对 “-update_package” 选项,获取更新包路径参数。
- 将解析后的参数保存到全局变量。
恢复出厂设置流程:
选择“设置”->“系统”->”系统还原”。
Main system 向 BCB 写入 “–wipe_data”;
Main system 重新启动 reboot(‘recovery’),进入 Recovery 模式;
get_args() 函数读取 BCB写入 “boot-recovery” 和 “–wipe_data”,获知需要擦除数据。
erase_volume() 执行格式化/data分区
同样格式化 /cache 分区
finish_recovery() 清除 BCB。然后重启进入 Main system。
OTA Recovery 升级流程:
主系统下载更新包到 /cache/some-filename.zip
主系统向 BCB 写入 “–update_package=/cache/some-filename.zip”
主系统重启进入 recovery
get_args() 向 BCB 写入 “boot-recovery” and “–update_package=…”
– 如此再下次异常重启后会重新进入 recovery 安装更新 –
nstall_package() 安装更新
finish_recovery() 完成安装,完成 recovery,擦除 BCB
– 如此之后系统重启将进入主系统 –
如果安装失败
7a. prompt_and_wait() 显示错误,并等待用户操作
7b. 用户重启进入主系统
3、恢复出厂设置流程
1.原生设置中响应 恢复出厂设置 功能,继而发出重置广播(Intent.ACTION_FACTORY_RESET) .
2.frameWork层 接收到此广播,根据广播所携带的参数执行Android层的Reset设定.
3.Android层执行到最后会将Reset配置信息写入 BCB 中,最终进入Recovery
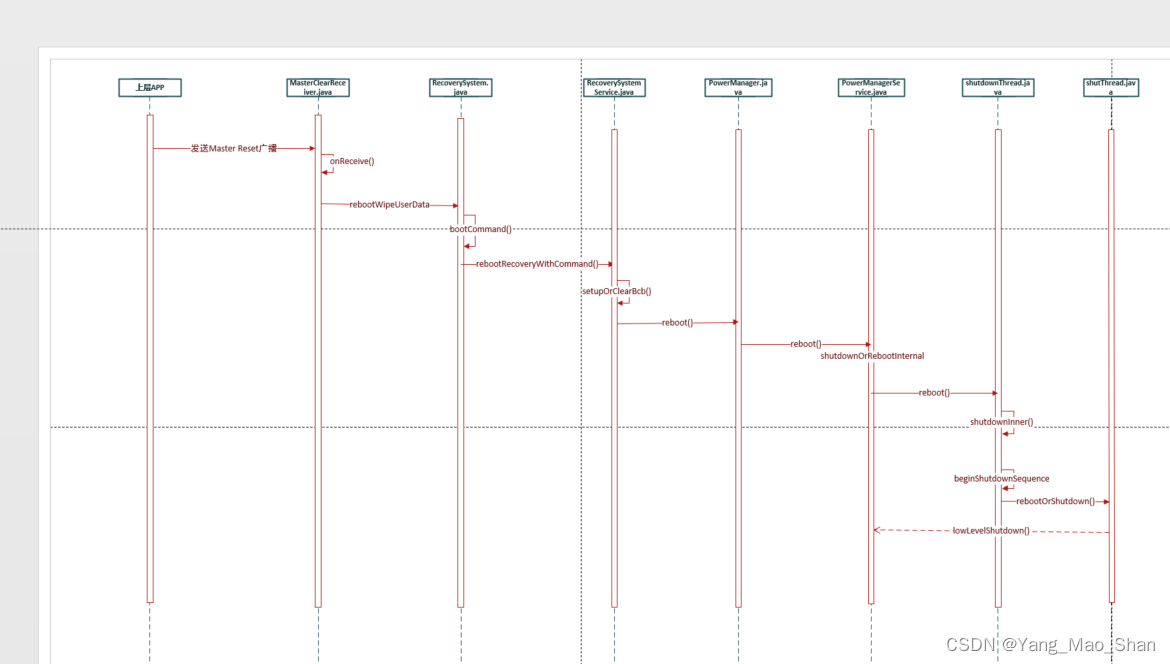
Master Reset 的时序图:

Master Reset 流程分析如下
(一)java层的代码解析
1.framework接收 Reset 广播
在framework/base/core/res/AndroidManifest.xml 中声明 MasterClearReceiver .java静态接收 Reset 广播
1.
3.
5.
                   //这条广播表示 恢复出厂设置
6.
7.
9.
10.
11.
12.
13.
14.
15.
2.MasterClearReceiver .onReceive()
在 MasterClearReceiver .java 执行 onReceive() 方法
framework/base/services/core/java/com/android/server/MasterClearReceiver .java
1. public void onReceive(final Context context, final Intent intent) {
2.	        if (intent.getAction().equals(Intent.ACTION_REMOTE_INTENT)) {
3.	            if (!"google.com".equals(intent.getStringExtra("from"))) {
4.	                Slog.w(TAG, "Ignoring master clear request -- not from trusted server.");
5.	                return;
6.	            }
7.	        }
8.	        if (Intent.ACTION_MASTER_CLEAR.equals(intent.getAction())) {
9.	            Slog.w(TAG, "The request uses the deprecated Intent#ACTION_MASTER_CLEAR, "
10.	                    + "Intent#ACTION_FACTORY_RESET should be used instead.");
11.	        }
12.	        if (intent.hasExtra(Intent.EXTRA_FORCE_MASTER_CLEAR)) {
13.	            Slog.w(TAG, "The request uses the deprecated Intent#EXTRA_FORCE_MASTER_CLEAR, "
14.	                    + "Intent#EXTRA_FORCE_FACTORY_RESET should be used instead.");
15.	        }
16.
17.	        final String factoryResetPackage = context
18.	                .getString(com.android.internal.R.string.config_factoryResetPackage);
           //判断如果广播是Intent.ACTION_FACTORY_RESET,且factoryResetPackage不为空
19.	        if (Intent.ACTION_FACTORY_RESET.equals(intent.getAction())
20.	                && !TextUtils.isEmpty(factoryResetPackage)) {
21.	            intent.setPackage(factoryResetPackage).setComponent(null);
            //重新将广播发出去
22.	            context.sendBroadcastAsUser(intent, UserHandle.SYSTEM);
23.	            return;
24.	        }

25.	        // 从广播中获取shutdown、reason、forceWipe、mWipeEsims等参数的值
           //mWipeExternalStorage代表是否需要擦除外部储存的标志
          // mWipeEsims代表是否需要擦除eSIM的标志
26.	        final boolean shutdown = intent.getBooleanExtra("shutdown", false);
27.	        final String reason = intent.getStringExtra(Intent.EXTRA_REASON);
28.	        mWipeExternalStorage = intent.getBooleanExtra(Intent.EXTRA_WIPE_EXTERNAL_STORAGE, false);
29.	        mWipeEsims = intent.getBooleanExtra(Intent.EXTRA_WIPE_ESIMS, false);
30.	        final boolean forceWipe = intent.getBooleanExtra(Intent.EXTRA_FORCE_MASTER_CLEAR, false)
31.	                || intent.getBooleanExtra(Intent.EXTRA_FORCE_FACTORY_RESET, false);
32.
33.	        Slog.w(TAG, "!!! FACTORY RESET !!!");
34.	        // The reboot call is blocking, so we need to do it on another thread.
            // 创建一个新线程thr
35.	        Thread thr = new Thread("Reboot") {
36.	            @Override
37.	            public void run() {
38.	                try {
39.	                    RecoverySystem
40.	                            .rebootWipeUserData(context, shutdown, reason, forceWipe,       mWipeEsims);
41.	                    Log.wtf(TAG, "Still running after master clear?!");
42.	                } catch (IOException e) {
43.	                    Slog.e(TAG, "Can't perform master clear/factory reset", e);
44.	                } catch (SecurityException e) {
45.	                    Slog.e(TAG, "Can't perform master clear/factory reset", e);
46.	                }
47.	            }
48.	        };
49.
50.	        if (mWipeExternalStorage) {
51.	            // thr will be started at the end of this task.
52.	            new WipeDataTask(context, thr).execute();
53.	        } else {
54.	            thr.start();
55.	        }
56.	    }
查看MasterClearReceiver代码,onReceive接收到广播时,判断如果广播是Intent.ACTION_FACTORY_RESET,且factoryResetPackage不为空,就重新将广播发出去,return退出。之后会创建一个新线程thr,该线程内部会重启并擦除用户数据,但是thr线程并不会立刻执行,而是会判断是否需要擦除外置存储卡或者sim卡中的数据,如果需要则会创建WipeDataTask对象,该对象内部会调用StorageManager的wipeAdoptableDisks方法清除外置存储卡的数据。
在调用StorageManager的wipeAdoptableDisks清除完外置存储卡中的数据之后,会执行thr线程的start方法,触发run方法,调用RecoverySystem的rebootWipeUserData方法,
3.RecoverySystem.rebootWipeUserData()
frameworks/base/core/java/android/os/RecoverySystem.java
RecoverySystem的rebootWipeUserData方法如下所示。
1.	public static void rebootWipeUserData(Context context, boolean shutdown, String 				reason, boolean force, boolean wipeEuicc) throws IOException {
    // 检查是否允许执行工厂重置,如果不允许则抛出SecurityException
3.	        UserManager um = (UserManager) 															context.getSystemService(Context.USER_SERVICE);
4.	        if (!force && um.hasUserRestriction(UserManager.DISALLOW_FACTORY_RESET)) {
5.	            throw new SecurityException("Wiping data is not allowed for this user.");
6.	        }
7.	        final ConditionVariable condition = new ConditionVariable();
8.	//发送Intent.ACTION_MASTER_CLEAR_NOTIFICATION广播,并等待其完成
9.	        Intent intent = new  																		Intent("android.intent.action.MASTER_CLEAR_NOTIFICATION");
10.	        intent.addFlags(Intent.FLAG_RECEIVER_FOREGROUND
11.	                | Intent.FLAG_RECEIVER_INCLUDE_BACKGROUND);
12.	        context.sendOrderedBroadcastAsUser(intent, UserHandle.SYSTEM,
13.	                android.Manifest.permission.MASTER_CLEAR,
14.	                new BroadcastReceiver() {
15.	                    @Override
16.	                    public void onReceive(Context context, Intent intent) {
17.	                        condition.open();
18.	                    }
19.	                }, null, 0, null, null);
20.
21.	        // Block until the ordered broadcast has completed.
22.	        condition.block();
23.	//如果需要擦除eUICC数据,则调用wipeEuiccData()执行擦除操作。否则调用removeEuiccInvisibleSubs()
24.	        EuiccManager euiccManager = context.getSystemService(EuiccManager.class);
25.	        if (wipeEuicc) {
26.	            wipeEuiccData(context, PACKAGE_NAME_EUICC_DATA_MANAGEMENT_CALLBACK);
27.	        } else {
28.	            removeEuiccInvisibleSubs(context, euiccManager);
29.	        }
30.
31.	        String shutdownArg = null;
32.	        if (shutdown) {
33.	            shutdownArg = "--shutdown_after";
34.	        }
35.
36.	        String reasonArg = null;
37.	        if (!TextUtils.isEmpty(reason)) {
38.	            String timeStamp = DateFormat.format("yyyy-MM-ddTHH:mm:ssZ", 							System.currentTimeMillis()).toString();
39.	            reasonArg = "--reason=" + sanitizeArg(reason + "," + timeStamp);
40.	        }
41.
42.	        final String localeArg = "--locale=" + Locale.getDefault().toLanguageTag() ;
43.	        Log.i(TAG," RecoverySystem.java rebootWipeUserData");
44.	        bootCommand(context, shutdownArg, "--wipe_data", reasonArg, localeArg);
45.	    }
rebootWipeUserData方法执行过程中,会发送封装好的参数 --wipe_data,–locale,然后调用bootCommand方法。
4.RecoverySystem.bootCommand()
BootCommand方法如下:
1.	private static void bootCommand(Context context, String... args) throws IOException {
2.	        LOG_FILE.delete();
3.	//构建command字符串,将args中的每个参数拼接并换行
4.	        StringBuilder command = new StringBuilder();
5.	        for (String arg : args) {
6.	            if (!TextUtils.isEmpty(arg)) {
7.	                command.append(arg);
8.	                command.append("\n");
9.	            }
10.	        }
11.
12.	        // Write the command into BCB (bootloader control block) and boot from
13.	        // there. Will not return unless failed.
14.	        RecoverySystem rs = (RecoverySystem)      context.getSystemService(Context.RECOVERY_SERVICE);
15.	        Log.i(TAG," RecoverySystem.java bootcommand");
16.	        rs.rebootRecoveryWithCommand(command.toString());
17.
18.	        throw new IOException("Reboot failed (no permissions?)");
19.	    }
这个方法会把传入的命令参数写入bootCommand中,bootCommand方法会进一步调用RecoverySystemService的rebootRecoveryWithCommand方法
5.RecoverySystemService.rebootRecoveryWithCommand()
frameworks/base/services/core/java/com/android/server/recoverysystem/RecoverySystemService.java
RecoverySystemService的rebootRecoveryWithCommand方法如下:
1.	public void rebootRecoveryWithCommand(String command) {
2.	        if (DEBUG) Slog.d(TAG, "rebootRecoveryWithCommand: [" + command + "]");
3.	        synchronized (sRequestLock) {
             //setupOrClearBcb将之前传递过来的参数写入BCB中
4.	            if (!setupOrClearBcb(true, command)) {
5.	                return;
6.	            }
7.
8.	          //   Having set up the BCB, go ahead and reboot.
9.	            PowerManager pm = mInjector.getPowerManager();
10.	            pm.reboot(PowerManager.REBOOT_RECOVERY);
11.	        }
12.	    }
private boolean setupOrClearBcb(boolean isSetup, String command) { mContext.enforceCallingOrSelfPermission(android.Manifest.permission.RECOVERY, null); //检查解密服务是否可用,如果不可用直接返回false final boolean available = checkAndWaitForUncryptService(); if (!available) { Slog.e(TAG, "uncrypt service is unavailable."); return false; } // 根据isSetup参数决定是设置BCB(setup-bcb)还是清除BCB(clear-bcb) if (isSetup) { mInjector.systemPropertiesSet("ctl.start", "setup-bcb"); } else { mInjector.systemPropertiesSet("ctl.start", "clear-bcb"); } //通过socket与 uncrypt通信,将之前的参数发送给 uncrypt // Connect to the uncrypt service socket. UncryptSocket socket = mInjector.connectService(); if (socket == null) { Slog.e(TAG, "Failed to connect to uncrypt socket"); return false; } try { // Send the BCB commands if it's to setup BCB. if (isSetup) { socket.sendCommand(command); } // Read the status from the socket. int status = socket.getPercentageUncrypted(); // Ack receipt of the status code. uncrypt waits for the ack so // the socket won't be destroyed before we receive the code. socket.sendAck(); //根据状态码判断设置/清除BCB是否成功,成功则返回true,失败返回false if (status == 100) { Slog.i(TAG, "uncrypt " + (isSetup ? "setup" : "clear") + " bcb successfully finished."); } else { // Error in /system/bin/uncrypt. Slog.e(TAG, "uncrypt failed with status: " + status); return false; } } catch (IOException e) { Slog.e(TAG, "IOException when communicating with uncrypt:", e); return false; } finally { socket.close(); } return true; }uncrypt.cpp对程序启动的参数分别处理,当参数为“setup-bcb”时调用setup_bcb()方法
bootable/recovery/uncrypt/uncrypt.cpp
static bool setup_bcb(const int socket) {
    // c5. receive message length
    int length;
    if (!android::base::ReadFully(socket, &length, 4)) {
        PLOG(ERROR)
        PLOG(ERROR)
        if (android::base::StartsWith(option, "--wipe_package=")) {
            std::string path = option.substr(strlen("--wipe_package="));
            if (!android::base::ReadFileToString(path, &wipe_package)) {
                PLOG(ERROR)
        LOG(ERROR)
        PLOG(ERROR)
  android::base::unique_fd fd(open(misc_blk_device.c_str(), O_WRONLY));
  if (fd == -1) {
    *err = android::base::StringPrintf("failed to open %s: %s", misc_blk_device.c_str(),
                                       strerror(errno));
    return false;
  }
    //通过lseek()将文件指针移动到offset偏移位置
  if (lseek(fd, static_cast
    *err = android::base::StringPrintf("failed to lseek %s: %s", misc_blk_device.c_str(),
                                       strerror(errno));
    return false;
  }
    //通过WriteFully()将p指向的缓冲区的数据写入fd文件描述符,大小为size个字节
  if (!android::base::WriteFully(fd, p, size)) {
    *err = android::base::StringPrintf("failed to write %s: %s", misc_blk_device.c_str(),
                                       strerror(errno));
    return false;
  }
    //通过fsync()刷新文件缓冲,将数据写入物理设备
  if (fsync(fd) == -1) {
    *err = android::base::StringPrintf("failed to fsync %s: %s", misc_blk_device.c_str(),
                                       strerror(errno));
    return false;
  }
  return true;
}

2.	        if (REBOOT_USERSPACE.equals(reason) && !isRebootingUserspaceSupported()) {
3.	            throw new UnsupportedOperationException(
4.	              "Attempted userspace reboot on a device that doesn't support it");
5.	        }
6.	        try {
7.	            mService.reboot(false, reason, true);
8.	        } catch (RemoteException e) {
9.	            throw e.rethrowFromSystemServer();
10.	        }
11.	    }

    //检查调用方是否有REBOOT和RECOVERY权限
2.	    mContext.enforceCallingOrSelfPermission(android.Manifest.permission.REBOOT, 				null);
3.	            if (PowerManager.REBOOT_RECOVERY.equals(reason)
4.	                    || PowerManager.REBOOT_RECOVERY_UPDATE.equals(reason)) {
5.	mContext.enforceCallingOrSelfPermission(android.Manifest.permission.RECOVERY, null);
6.	            }
7.
8.	            final long ident = Binder.clearCallingIdentity();
9.	            try {
10.	                Log.i(TAG," powermanagerservice.java reboot start");
11.	                (HALT_MODE_REBOOT, confirm, reason, wait);
12.	                Log.i(TAG," powermanagerservice.java reboot---                     shutdownOrRebootInternal");
13.	            } finally {
14.	                Binder.restoreCallingIdentity(ident);
15.	            }
16.	        }
17.	    private void shutdownOrRebootInternal(final @HaltMode int haltMode, final boolean               confirm,@Nullable final String reason, boolean wait) {
19.	        if (PowerManager.REBOOT_USERSPACE.equals(reason)) {
20.	            if (!PowerManager.isRebootingUserspaceSupportedImpl()) {
21.	                throw new UnsupportedOperationException(
22.	                 "Attempted userspace reboot on a device that doesn't support it");
23.	            }
24.	            UserspaceRebootLogger.noteUserspaceRebootWasRequested();
25.	        }
26.	        if (mHandler == null || !mSystemReady) {
27.	            if (RescueParty.isAttemptingFactoryReset()) {
28.	                // If we're stuck in a really low-level reboot loop, and a
29.	                // rescue party is trying to prompt the user for a factory data
30.	                // reset, we must GET TO DA CHOPPA!
31.	                PowerManagerService.lowLevelReboot(reason);
32.	            } else {
33.	                throw new IllegalStateException("Too early to call shutdown() or                                reboot()");
34.	            }
35.	        }
36. 	//创建一个Runnable,在run()方法中根据haltMode的值来调用ShutdownThread的reboot()、     rebootSafeMode()或shutdown()方法执行重启或关机操作
37.	        Runnable runnable = new Runnable() {
38.	            @Override
39.	            public void run() {
40.	                synchronized (this) {
41.	                    if (haltMode == HALT_MODE_REBOOT_SAFE_MODE) {
42.	                        ShutdownThread.rebootSafeMode(getUiContext(), confirm);
43.	                    } else if (haltMode == HALT_MODE_REBOOT) {
44.	                         //走到这里
45.	                        ShutdownThread.reboot(getUiContext(), reason, confirm);
46.	                    } else {
47.	                        ShutdownThread.shutdown(getUiContext(), reason, confirm);
48.	                    }
49.	                }
50.	            }
51.	        };
52.
53.	        // ShutdownThread must run on a looper capable of displaying the UI.
54.	        Message msg = Message.obtain(UiThread.getHandler(), runnable);
55.	        msg.setAsynchronous(true);
56.	        UiThread.getHandler().sendMessage(msg);
57.
58.	        // PowerManager.reboot() is documented not to return so just wait for the                   inevitable.
           //PowerManager.reboot()被记录为不会返回,所以只需等待不可避免的结果。
59.	        if (wait) {
60.	            synchronized (runnable) {
61.	                while (true) {
62.	                    try {
63.	                        runnable.wait();
64.	                    } catch (InterruptedException e) {
65.	                    }
66.	                }
67.	            }
68.	        }
69.	    }

2.	        mReboot = true;
3.	        mRebootSafeMode = false;
4.	        mRebootHasProgressBar = false;
5.	        mReason = reason;
6.	         //走到这里
7.	        shutdownInner(context, confirm);
8.	    }
9.	    private static void shutdownInner(final Context context, boolean confirm) {
10.	        // ShutdownThread is called from many places, so best to verify here that the                context passed
11.	        // in is themed.
12.	        context.assertRuntimeOverlayThemable();
13.
14.	        // ensure that only one thread is trying to power down.
15.	        // any additional calls are just returned
           // 检查sIsStarted标志位,确保重启操作没有已经启动,防止重复调用
16.	        synchronized (sIsStartedGuard) {
17.	            if (sIsStarted) {
18.	                Log.d(TAG, "Request to shutdown already running, returning.");
19.	                return;
20.	            }
21.	        }
22.	//根据longPressBehavior和mRebootSafeMode的值决定显示哪个确认对话框
23.	        final int longPressBehavior = context.getResources().getInteger(
24.	        com.android.internal.R.integer.config_longPressOnPowerBehavior);
25.	        final int resourceId = mRebootSafeMode
26.	                ? com.android.internal.R.string.reboot_safemode_confirm
27.	                : (longPressBehavior == 2
28.	                        ? com.android.internal.R.string.shutdown_confirm_question
29.	                        : com.android.internal.R.string.shutdown_confirm);
30.
31.	        Log.d(TAG, "Notifying thread to start shutdown longPressBehavior=" +                            longPressBehavior);
32.	   //如果confirm为true,则显示确认对话框
33.	        if (confirm) {
34.	            final CloseDialogReceiver closer = new CloseDialogReceiver(context);
35.	            if (sConfirmDialog != null) {
36.	                sConfirmDialog.dismiss();
37.	            }
38.	            sConfirmDialog = new AlertDialog.Builder(context)
39.	                    .setTitle(mRebootSafeMode
40.	                            ? com.android.internal.R.string.reboot_safemode_title
41.	                            : com.android.internal.R.string.power_off)
42.	                    .setMessage(resourceId)
43.	                    .setPositiveButton(com.android.internal.R.string.yes, new                                    DialogInterface.OnClickListener() {
44.	                        public void onClick(DialogInterface dialog, int which) {
45.	                            beginShutdownSequence(context);
46.	                        }
47.	                    })
48.	                    .setNegativeButton(com.android.internal.R.string.no, null)
49.	                    .create();
50.	            closer.dialog = sConfirmDialog;
51.	            sConfirmDialog.setOnDismissListener(closer);
52.	            sConfirmDialog.getWindow().
                           setType(WindowManager.LayoutParams.TYPE_KEYGUARD_DIALOG);
53.	            sConfirmDialog.show();
54.	        } else {// 如果confirm为false,则直接调用beginShutdownSequence启动关机序列
55.	            beginShutdownSequence(context);
56.	        }
57.	    }

2.	        synchronized (sIsStartedGuard) {
    //检查sIsStarted标志位,确保关机序列没有已经启动,防止重复启动
3.	            if (sIsStarted) {
4.	                Log.d(TAG, "Shutdown sequence already running, returning.");
5.	                return;
6.	            }
7.	            sIsStarted = true;
8.	        }
9.	//显示shutdownDialog对话框并获取Context
10.	        sInstance.mProgressDialog = showShutdownDialog(context);
11.	        sInstance.mContext = context;
    //获取PowerManager实例,用于后续获取WakeLock
12.	        sInstance.mPowerManager =                      (PowerManager)context.getSystemService(Context.POWER_SERVICE);
13.
14.	        // make sure we never fall asleep again
15.	        sInstance.mCpuWakeLock = null;
16.	        try {
17.	            sInstance.mCpuWakeLock = sInstance.mPowerManager.newWakeLock(
18.	                    PowerManager.PARTIAL_WAKE_LOCK, TAG + "-cpu");
19.	            sInstance.mCpuWakeLock.setReferenceCounted(false);
20.	            sInstance.mCpuWakeLock.acquire();
21.	        } catch (SecurityException e) {
22.	            Log.w(TAG, "No permission to acquire wake lock", e);
23.	            sInstance.mCpuWakeLock = null;
24.	        }
25.
26.	        // also make sure the screen stays on for better user experience
        //检查屏幕是否已开启,如果是则获取一个FULL_WAKE_LOCK权限的ScreenWakeLock,保持屏幕常亮
27.	        sInstance.mScreenWakeLock = null;
28.	        if (sInstance.mPowerManager.isScreenOn()) {
29.	            try {
30.	                sInstance.mScreenWakeLock = sInstance.mPowerManager.newWakeLock(
31.	                        PowerManager.FULL_WAKE_LOCK, TAG + "-screen");
32.	                sInstance.mScreenWakeLock.setReferenceCounted(false);
33.	                sInstance.mScreenWakeLock.acquire();
34.	            } catch (SecurityException e) {
35.	                Log.w(TAG, "No permission to acquire wake lock", e);
36.	                sInstance.mScreenWakeLock = null;
37.	            }
38.	        }
39.
40.	        if (SecurityLog.isLoggingEnabled()) {
41.	            SecurityLog.writeEvent(SecurityLog.TAG_OS_SHUTDOWN);
42.	        }
43.
44.	        // start the thread that initiates shutdown
           //创建Handler并启动关机线程
45.	        sInstance.mHandler = new Handler() {
46.	        };
47.	      // 启动线程
48.	        sInstance.start();
49.	    }

2.	        TimingsTraceLog shutdownTimingLog = newTimingsLog();
3.	        shutdownTimingLog.traceBegin("SystemServerShutdown");
4.	        metricShutdownStart();
5.	        metricStarted(METRIC_SYSTEM_SERVER);
6.
7.	        BroadcastReceiver br = new BroadcastReceiver() {
8.	            @Override public void onReceive(Context context, Intent intent) {
9.	                // We don't allow apps to cancel this, so ignore the result.
10.	                actionDone();
11.	            }
12.	        };
13.	 ……
14.	        shutdownTimingLog.traceEnd(); // SystemServerShutdown
15.	        metricEnded(METRIC_SYSTEM_SERVER);
16.	        saveMetrics(mReboot, mReason);
17.	        // Remaining work will be done by init, including vold shutdown
            // 重启前的准备工作结束, 开始重启
18.	        rebootOrShutdown(mContext, mReboot, mReason);
19.	    }

    // 如果reboot为true,则先调用PowerManagerService.lowLevelReboot()尝试重启。如果重启失败,则将reason设置为null,并进行关机操作
2.	        if (reboot) {
3.	            Log.i(TAG, "Rebooting, reason: " + reason);
4.	            PowerManagerService.lowLevelReboot(reason);
5.	            Log.e(TAG, "Reboot failed, will attempt shutdown instead");
6.	            reason = null;
7.	        } else if (SHUTDOWN_VIBRATE_MS  0 && context != null) {
8.	            // vibrate before shutting down(关闭前振动)
9.	            Vibrator vibrator = new SystemVibrator(context);
10.	            try {
11.	                vibrator.vibrate(SHUTDOWN_VIBRATE_MS, VIBRATION_ATTRIBUTES);
12.	            } catch (Exception e) {
13.	                // Failure to vibrate shouldn't interrupt shutdown.  Just log it.
                    //振动故障不应中断停机。只需记录即可。
14.	                Log.w(TAG, "Failed to vibrate during shutdown.", e);
15.	            }
16.
17.	            // vibrator is asynchronous so we need to wait to avoid shutting down too                    soon.(可控震源是异步的,所以我们需要等待以避免过早关闭。)
18.	            try {
19.	                Thread.sleep(SHUTDOWN_VIBRATE_MS);
20.	            } catch (InterruptedException unused) {
21.	            }
22.	        }
23.	        // Shutdown power
24.	        Log.i(TAG, "Performing low-level shutdown...");
25.	        PowerManagerService.lowLevelShutdown(reason);
26.	    }

     //检查reason是否为空,如果是则设置为空字符串
2.	        if (reason == null) {
3.	            reason = "";
4.	        }
5.
6.	        // If the reason is "quiescent", it means that the boot process should 						proceed
7.	        // without turning on the screen/lights.
8.	        // The "quiescent" property is sticky, meaning that any number
9.	        // of subsequent reboots should honor the property until it is reset.

    //如果reason为"quiescent"或以",quiescent"结尾,则设置sQuiescent标志位,并截取reason
10.	        if (reason.equals(PowerManager.REBOOT_QUIESCENT)) {
11.	            sQuiescent = true;
12.	            reason = "";
13.	        } else if (reason.endsWith("," + PowerManager.REBOOT_QUIESCENT)) {
14.	            sQuiescent = true;
15.	            reason = reason.substring(0,
16.	                    reason.length() - PowerManager.REBOOT_QUIESCENT.length() - 1);
17.	        }
18.	// 如果reason为REBOOT_RECOVERY或REBOOT_RECOVERY_UPDATE,则将reason设置为"recovery"
19.	        if (reason.equals(PowerManager.REBOOT_RECOVERY)
20.	                || reason.equals(PowerManager.REBOOT_RECOVERY_UPDATE)) {
21.	         // 走的这里
22.	            reason = "recovery";
23.	        }
24.	// 如果sQuiescent被设置,则将",quiescent"追加到reason的末尾
25.	        if (sQuiescent) {
28.	            reason = reason + ",quiescent";
29.	        }
30.	        // 设置这个prop触发init进程重启进入recovery模式
31.	        SystemProperties.set("sys.powerctl", "reboot," + reason);
32.	        try {
33.	            Thread.sleep(20 * 1000L);
34.	        } catch (InterruptedException e) {
35.	            Thread.currentThread().interrupt();
36.	        }
37.	        Slog.wtf(TAG, "Unexpected return from lowLevelReboot!");
38.	    }


还没有评论,来说两句吧...