温馨提示:这篇文章已超过468天没有更新,请注意相关的内容是否还可用!
摘要:本文介绍了Android系统中与T WMS窗口相关的流程。这些流程涉及T WMS窗口的创建、显示、管理和交互等方面。通过优化这些流程,可以提高Android系统的性能和用户体验,包括响应速度、界面流畅度和资源利用率等。对于开发者而言,了解这些流程有助于更好地集成和定制T WMS窗口,以满足不同应用的需求。
文章目录
- 一、介绍
- 二、流程简述
- 1.客户端
- 2. 通信方式
- 3. 服务端
- 3.1.addWindow
- 3.2 relayoutWindow
- 3.3 finishDrawingWindow
- 4.窗口状态变化总结
- 5.移除流程简述
- 三、代码流程详解
- 1.客户端
- 1.1 Activity走到onresume后
- 1.2 Token的创建与传递
- 1.3 ViewRootImpl的创建
- 1.4 ViewRootImpl与WMS的通信
- 2.服务端
- 2.1 窗口添加
- 2.1.1 接收客户端请求
- 2.1.2 addWindow
- 2.1.3 WindowToken的创建
- 2.1.4 WindowState初始化
- 2.1.5 将WindowState加入到WindowToken
- 2.2 窗口位置和大小计算
- 2.2.1 接收客户端请求
- 2.2.2 relayoutWindow
- 2.2.3 创建SurfaceControl
- 2.2.4 计算窗口大小位置
- 1.处理窗口布局循环
- 2.处理所有Surface的状态变更,以及调用layoutWindowLw的流程
- 3.计算窗口位置大小
- 2.3 窗口状态刷新
- 2.3.1 接受客户端请求
- 2.3.2 finishDrawingWindow
- 1.mDrawState的状态更变
- 2.请求布局刷新
- * 窗口位置计算与窗口状态刷新流程不同点
- 2.3.3 mDrawState变更为HAS_DRAW
- 1.mApplySurfaceChangesTransaction
- 2.checkAppTransitionReady()
- 3.再次请求布局
- 2.3.4 show Surface
- 2.4 performSurfacePlacement()流程总结
一、介绍
什么是窗口
窗口即是屏幕上的一块用于绘制各种UI元素并可以响应用户输入的一个矩形区域。从原理上讲,窗口的概念是独自占有一个Surface实例的显示区域(我们在屏幕上看到的图形都需要绘制在Surface上)。
Window是个抽象类其实现类为PhoneWindow。
本文以窗口添加的流程为例,讲解窗口添加相关的流程及其涉及的方法。
其他建议:可以先学习层级结构树相关内容,有助于对窗口模块的理解
Android T 窗口层级其一 —— 容器类
Android T 窗口层级其二 —— 层级结构树的构建
Android T 窗口层级其三 —— 层级结构树添加窗口
二、流程简述
当Activity.onResume()被调用之后,客户端会与WMS进行通信将我们的布局显示在屏幕上。其中主要涉及以下几个过程:
客户端通知WMS创建一个窗口,并添加到WindowToken。即addToDisplayAsUser阶段。
客户端通知WMS创建Surface,并计算窗口尺寸大小。即relayoutWindow阶段。
客户端获取到WMS计算的窗口大小后,进一步测量该窗口下View的宽度和高度。即performMeasure阶段。
客户端确定该窗口下View的尺寸和位置。即performLayout阶段。
确定好View的尺寸大小位置之后,便对View进行绘制。即performDraw阶段。
通知WMS,客户端已经完成绘制。WMS进行系统窗口的状态刷新以及动画处理,并最终将Surface显示出来。即reportDrawFinished阶段。
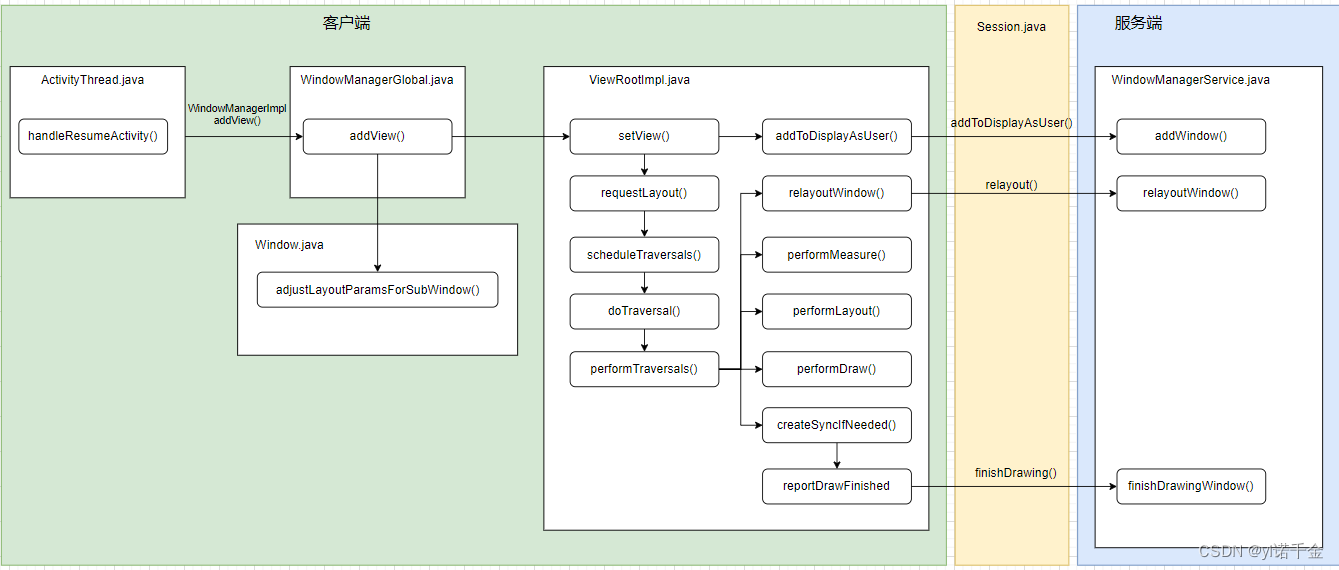
这里以Activity.onResume()被调用之后为起点
1.客户端
WindowManager:是一个接口类,负责窗口的管理(增、删、改)。
WindowManagerImpl:WindowManager的实现类,但是他把对于窗口的具体管理操作交给WindowManagerGlobal来处理。
WindowManagerGlobal:是一个单例类,实现了窗口的添加、删除、更新的逻辑,但是
ViewRootImpl:通过IWindowSession与WMS进行通信。其内部类W实现了WMS与ViewRootImpl的通信。
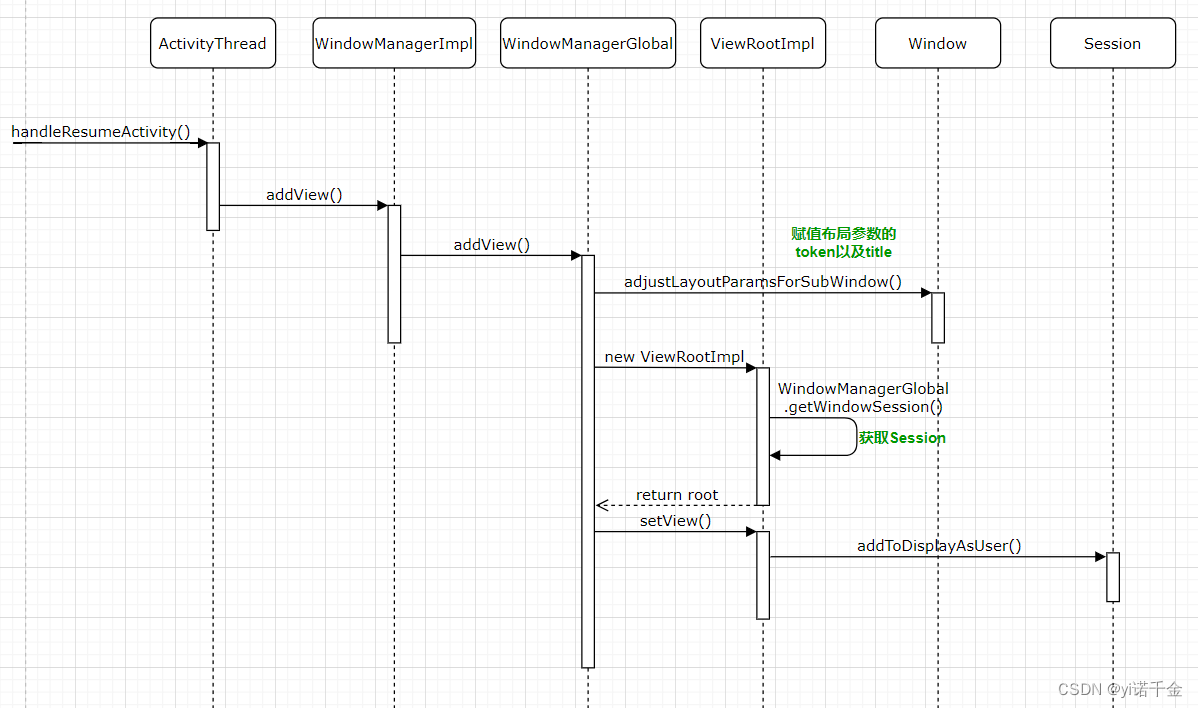
ActivityThread.java
- handleResumeActivity
通过WindowManager接口添加view,即wm.addView(decor, l);,wm为ViewManager对象,即ViewManager wm = a.getWindowManager();
WindowManagerImpl.java
- addView
mGlobal.addView(view, params, mContext.getDisplayNoVerify(), mParentWindow,mContext.getUserId());mGlobal为WindowManagerGlobal对象。
WindowManagerGlobal.java
- addView
root.setView(view, wparams, panelParentView, userId);root为ViewRootImpl对象。
parentWindow.adjustLayoutParamsForSubWindow(wparams);parentWindow为Window(Window为抽象类,PhoneWindow继承于Window),即在Window中调用adjustLayoutParamsForSubWindow,用于赋值参数布局的token以及title
ViewRootImpl.java
- setView
1.addToDisplayAsUser
客户端通知WMS创建一个窗口,并添加到WindowToken
res = mWindowSession.addToDisplayAsUser(mWindow,mWindowAttributes,getHostVisibility(), mDisplay.getDisplayId(), userId,mInsetsController.getRequestedVisibilities(), inputChannel, mTempInsets,mTempControls);
2.requestLayout
在添加到窗口管理器之前安排第一个布局,以确保我们在从系统接收任何其他事件之前进行重新布局
scheduleTraversals->doTraversal->performTraversals
performTraversals中调用了五个关键方法:
relayoutWindow
客户端通知WMS创建Surface,并计算窗口尺寸大小
performMeasure
客户端获取到WMS计算的窗口大小后,进一步测量该窗口下View的宽度和高度
performLayout
客户端确定该窗口下View的尺寸和位置
performDraw
确定好View的尺寸大小位置之后,便对View进行绘制
createSyncIfNeeded->reportDrawFinished
通知WMS,客户端已经完成绘制。WMS进行系统窗口的状态刷新以及动画处理,并最终将Surface显示出来
2. 通信方式
Session表示一个客户端和服务端的交互会话。一般来说不同的应用通过不同的会话来和WindowManagerService交互,但是处于同一个进程的不同应用通过同一个Session来交互。
IWindowSession.aidl
ViewRootImpl中通过此接口调用服务端
1.addToDisplayAsUser
2.relayout
3.finishDrawing
Session.java
IWindowSession的实现在这里,最终调用到WMS中
1.addToDisplayAsUser->addWindow
2.relayout->relayoutWindow
3.finishDrawing->finishDrawingWindow
3. 服务端
WindowManagerService:负责为Activity对应的窗口分配Surface,管理Surface的显示顺序以及位置尺寸,控制窗口动画,并且还是输入系统的一个重要中转站。
WindowState:和客户端窗口一一对应,在向WMS添加一个窗口时,WMS会为其创建一个WindowState,来表示窗口的所有属性,WindowState相当于属性窗口管理(比如对外提供操作接口,属于层级结构中最底部的容器),窗口画面相关都剥离给了WindowStateAnimator,WindowState也是WMS中事实上的窗口。
WindowStateAnimator:主要用于管理WindowState相关画面surface,通过mDrawState参数来描述Surface所处的状态。
WindowToken:保存了所有具有同一个token的WindowState,将属于同一个activity的窗口组织在一起,activity在需要更新窗口时,必须向WMS提供WindowToken以表名自己的身份,并且窗口的类型必须与所持有的的WindowToken类型一致。
补充:一个WindowToken可以对应多个WindowState。 WindowToken是一个用于表示窗口层次结构中的窗口的标识符。每个Window具有一个与之关联的WindowToken,它用于帮助系统管理窗口的显示和交互。
一个WindowToken可以有多个WindowState表示与之相关的窗口。这是因为在Android系统中,可能会存在一些特殊情况,例如PopupWindow、Dialog等,它们属于同一个WindowToken,但是显示在不同的窗口上。
因此,一个WindowToken可以与多个WindowState关联,这样可以实现多个窗口的操作和管理。
WindowSurfaceController:用来创建SurfaceControl。
DisplayContent:即代表的是单个屏幕。隶属于同一个DisplayContent的窗口将会被显示在同一个屏幕中。每个DisplayContent都对应着一个唯一的id,在添加窗口时可以通过指定这个ID决定将其显示在哪个屏幕中。
WindowSurfacePlacer:整个窗口层次结构刷新的入口。
RootWindowContainer:是窗口容器的顶层容器,其直接管理DisplayContent。
WindowManagerService.java
3.1.addWindow
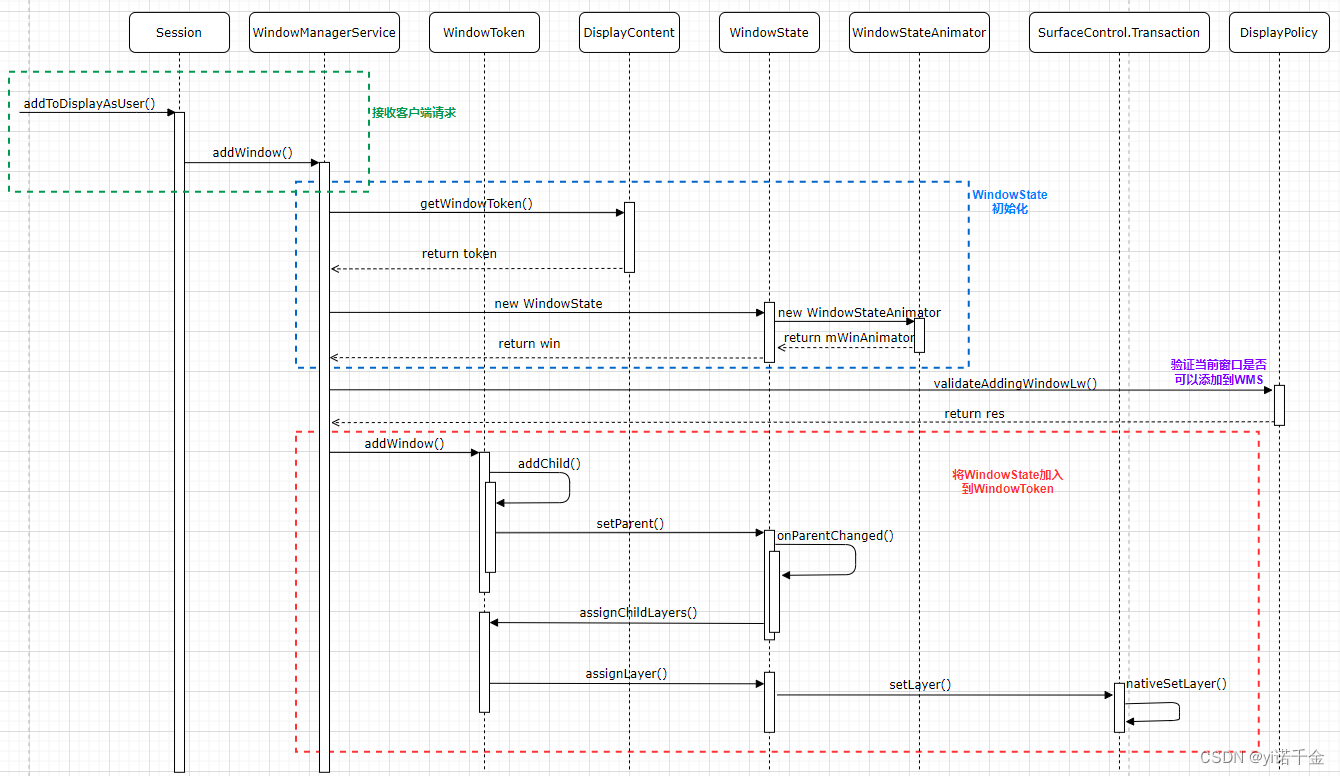
1.根据客户端传来的token获取WindowToken或创建WindowToken,并将其挂载到对应的层级节点上
WindowToken token = displayContent.getWindowToken(hasParent ? parentWindow.mAttrs.token : attrs.token);
判断WindowToken是否有父亲,即parentWindow 是否不为空
final boolean hasParent = parentWindow != null;
注:前面代码有判断是否是子窗口,是则会给parentWindow 赋值;否则parentWindow仍为初始值,即为空
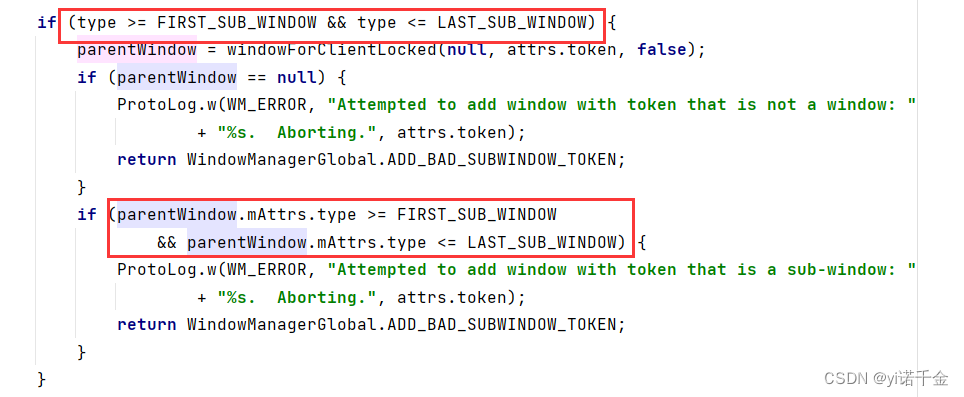
关于窗口类型,见 窗口常见参数汇总
Activity启动时会在ActivityRecord的构造方法中new Token()。
应用侧直接通过addView的方式添加窗口不会有ActivityRecord,因此不会在ActivityRecord的构造方法中new Token()。
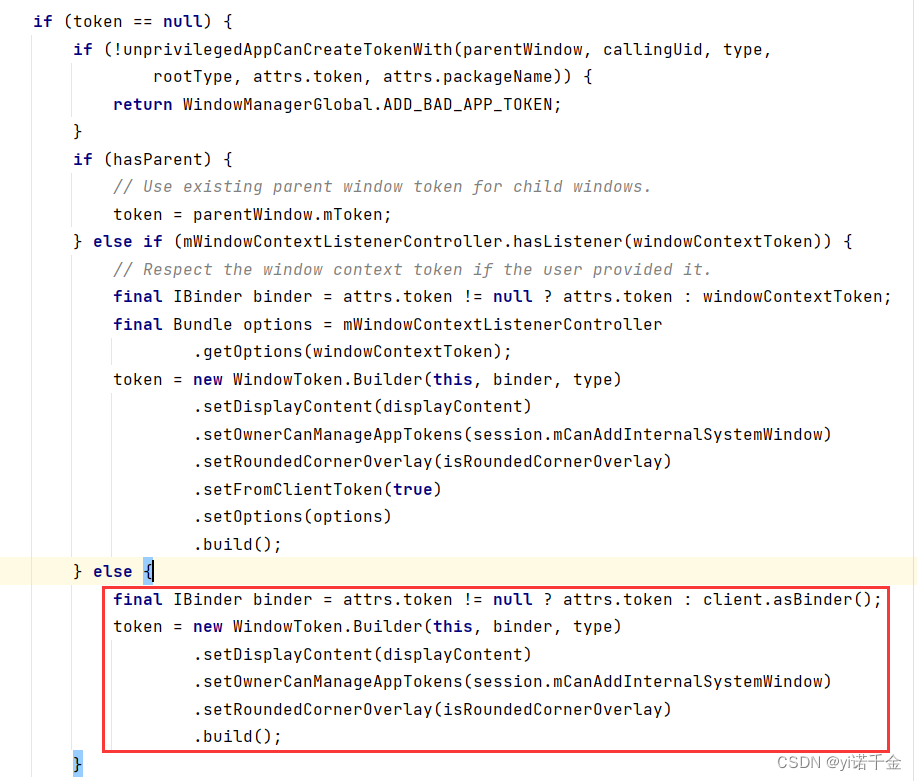
系统侧直接添加的窗口(状态栏、导航栏等),是通过new WindowToken.Builder的方式添加
即主动使用ViewManager.addView来添加一个窗口则不会在ActivityRecord的构造方法中new Token(),否则通过new WindowToken.Builder的方式添加。
attrs.token这个参数一可以在应用端设置,应用没有设置token那么就为空,token为IBinder类型对象,默认值为空public IBinder token = null;
例如:
在应用侧可通过mLayoutParams.token的方式设置值
private WindowManager.LayoutParams mLayoutParams;
mLayoutParams.token = null;
后面会继续判断token是否为空,最终会到最后的else中创建token
2.创建WindowState
final WindowState win = new WindowState(this, session, client, token, parentWindow, appOp[0], attrs, viewVisibility, session.mUid, userId,session.mCanAddInternalSystemWindow);
3.验证当前窗口是否可以添加到WMS
res = displayPolicy.validateAddingWindowLw(attrs, callingPid, callingUid);
该方法会对窗口TYPE,FLAG等多方面判断。只有返回ADD_OKAY时表示允许当前窗口的添加,反之则不允许添加该窗口。假如想禁止某些应用做添加窗口操作时,可以在里面通过应用的包名过滤该应用,也可以直接在WindowManagerGlobal.java的addView()方法中直接对应用想要添加的窗口进行过滤。
注:ADD_OKAY在WindowManagerGlobal中定义,这个类里面还有一些其他的返回值,所有返回给res的常量最终会在ViewRootImpl的setView方法中判断
4.调用openInputChannel,初始化input相关通路(本文不做讨论)
final boolean openInputChannels = (outInputChannel != null && (attrs.inputFeatures & INPUT_FEATURE_NO_INPUT_CHANNEL) == 0);
if (openInputChannels) { win.openInputChannel(outInputChannel); }
5.将WindowState加入到WindowToken
win.mToken.addWindow(win);
WMS窗口添加之后,还没有创建Surface,此时mDrawState状态为NO_SURFACE
3.2 relayoutWindow
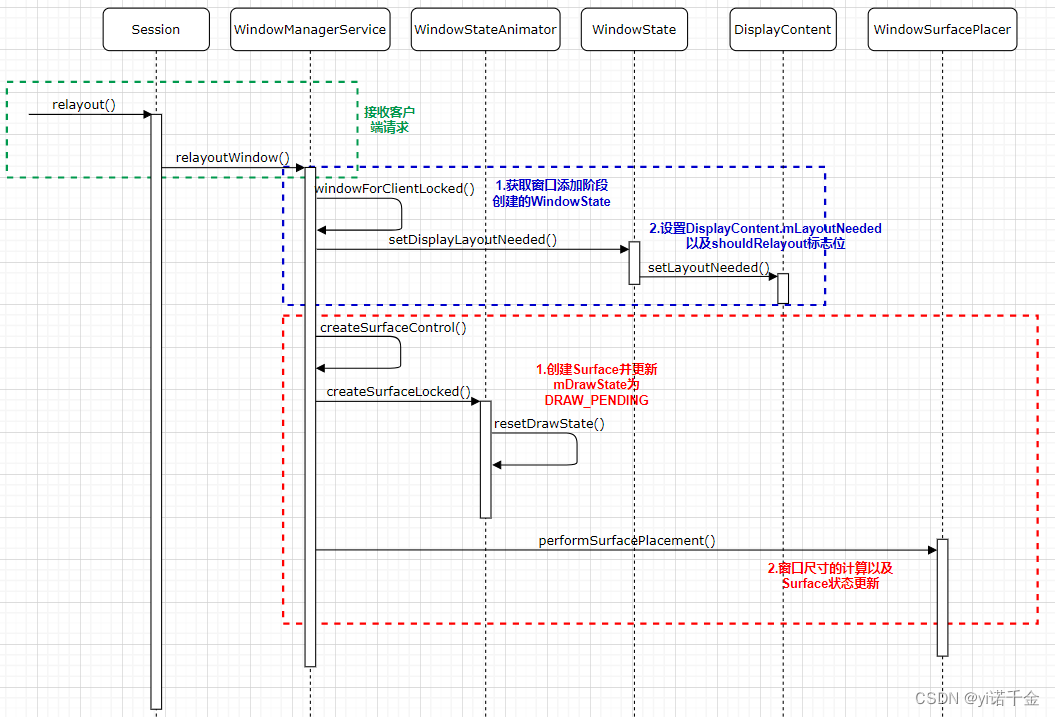
1.根据客户端传递过来的IWindow的mWindowMap获取窗口添加阶段创建的WindowState
final WindowState win = windowForClientLocked(session, client, false);
2.设置DisplayContent.mLayoutNeeded以及shouldRelayout标志位
win.setDisplayLayoutNeeded();win为WindowState对象,该方法实际操作在DisplayContent中
final boolean shouldRelayout = viewVisibility == View.VISIBLE &&(win.mActivityRecord == null || win.mAttrs.type == TYPE_APPLICATION_STARTING || win.mActivityRecord.isClientVisible());
3.创建SurfaceControl
在layoutWindow()调用了createSurfaceControl方法创建SurfaceControl
result = createSurfaceControl(outSurfaceControl, result, win, winAnimator);该方法的实现仍然在WMS中
这里以createSurfaceControl方法为起点
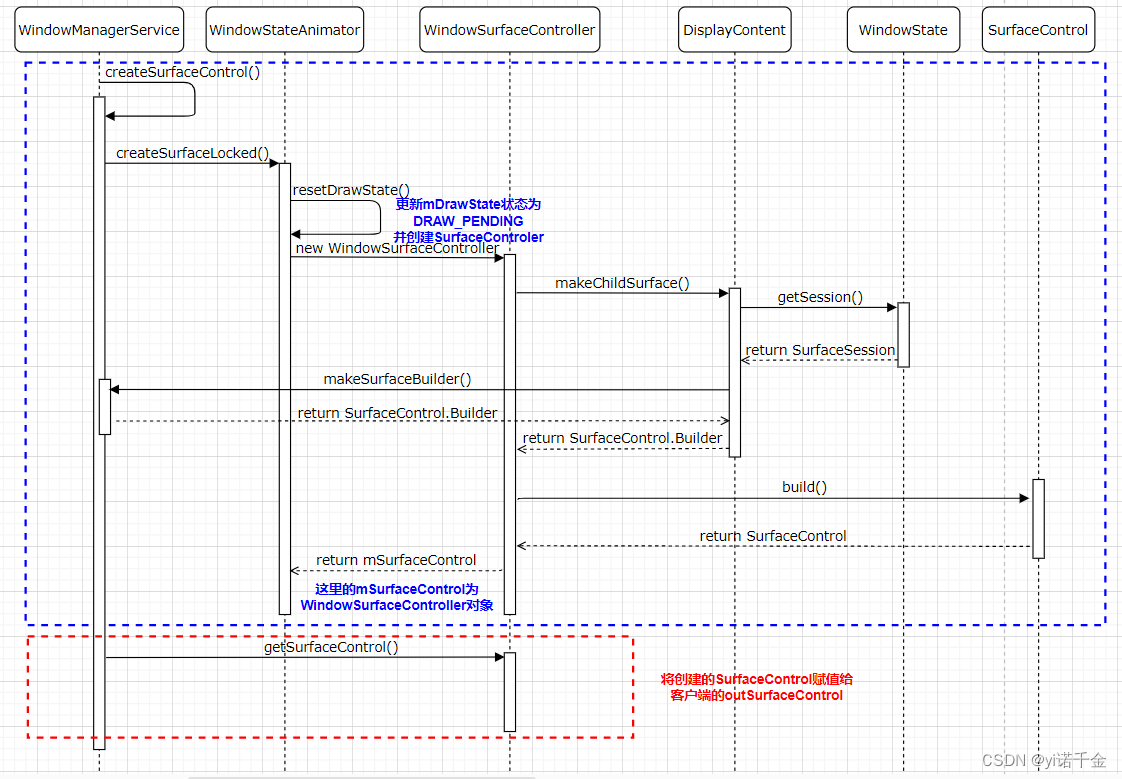
在createSurfaceControl()中调用WindowStateAnimator执行具体的SurfaceControl的创建 surfaceController = winAnimator.createSurfaceLocked();
创建Surface后,Surface还未进行绘制,此时mDrawState状态为DRAW_PENDING
将创建的SurfaceControl赋值给客户端的outSurfaceControl
surfaceController.getSurfaceControl(outSurfaceControl);
4.窗口尺寸的计算以及Surface状态更新
在layoutWindow()调用了performSurfacePlacement
mWindowPlacerLocked.performSurfacePlacement(true /* force */);mWindowPlacerLocked为WindowSurfacePlacer对象,因此这里以WindowSurfacePlacer的performSurfacePlacement()为起点

处理窗口布局循环
WindowSurfacePlacer.performSurfacePlacementLoop()
处理Surface的状态更变,以及调用LayoutWindowLw的流程
RootWindowContainer.performSurfacePlacementNoTrace()
计算窗口位置大小
DisplayPolicy.layoutWindowLw()
3.3 finishDrawingWindow
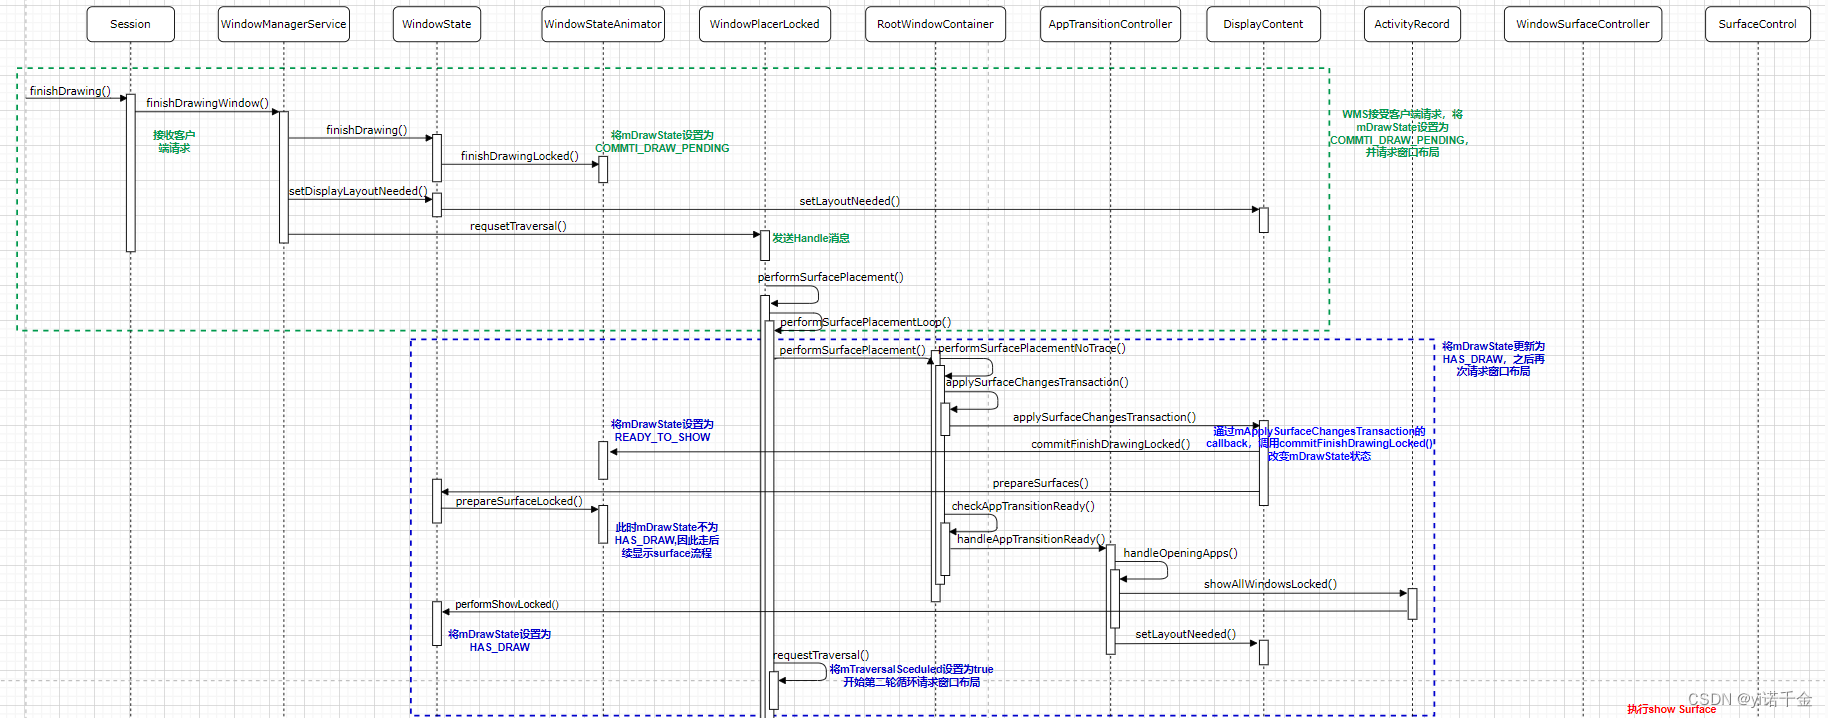

1.WMS接受客户端请求,将mDrawState更新为COMMIT_DRAW_PEDINGwin.finishDrawing(postDrawTransaction, seqId),并请求窗口布局mWindowPlacerLocked.requestTraversal();
2.通过mApplySurfaceChangesTransaction的callback,

调用commitFinishDrawingLocked()

改变mDrawState状态将mDrawState更新为READY_TO_SHOW,
最终mDrawState更新为HAS_DRAW后,再次请求窗口布局
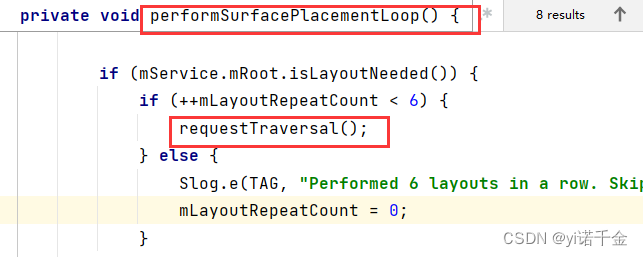
3.执行show Surface
showSurfaceRobustlyLocked(t)
注:WindowStateAnimator的commitFinishDrawingLocked()方法中,如果是应用通过WindowManager中的addView的方式创建窗口,则不会有ActivityRecord,或者该窗口类型为启动窗口,则直接调用result = mWin.performShowLocked();,即WindowState的performShowLocked()方法改变窗口状态为HAS_DRAW,否则会从RootWindowContainer的checkAppTransitionReady方法逐步调用到performShowLocked()

4.窗口状态变化总结
WMS为了管理窗口的显示进度,在WindowStateAnimator中定义了mDrawState来描述Surface所处的状态。主要有如下五种状态:
NO_SURFACE:WMS添加窗口,即调用addWindow之后,还没有创建Surface,mDrawState处于该状态。
DRAW_PENDING:app调用relayoutWindow创建Surface后,但是Surface还没有进行绘制,mDrawState处于该状态。
COMMIT_DRAW_PENDING:app完成Surface的绘制,调用finishDrawing,将mDrawState设置为该状态。
READY_TO_SHOW:在performSurfacePlacement过程中会将所有处于COMMIT_DRAW_PENDING状态的mDrawState变更为READY_TO_SHOW。
HAS_DRAW:若准备显示窗口,WMS执行performShowLocked,将mDrawState设置为该状态

窗口显示相关方法 工作内容解释 addWindow App向WMS请求添加窗口记录,会在WMS里新建WindowState(NO_SURFACE) relayoutWindow App向WMS申请surface用于绘制,执行后window拥有了surface(NO_SURFACE->DRAW_PENDING) finishDrawingWindow App在surface上完成绘制后,通知WMS(DRAW_PENDING->COMMIT_DRAW_PENDING) commitFinishDrawingLocked WMS遍历window,对于完成绘制的window(COMMIT_DRAW_PENDING->READY_TO_SHOW) performShowLocked 判断系统是否允许窗口显示isReadyForDisplay(READY_TO_SHOW->HAS_DRAWN) showSurfaceRobustlyLocked 对HAS_DRAWN状态的窗口,用SurfaceControl通知SurfaceFlinger显示出来 5.移除流程简述
窗口移除从App端发起,当Activity执行destroy(),即以handleDestroyActivity()为起点,执行wm.removeViewImmediate()开启;
通过WindowManagerGlobal–>ViewRootImpl–>Session–>WindowManagerService的removeWindow(),调用到WindowState的removeIfPossible()–>removeImmediately(),接着调用到WindowStateAnimator的destroySurfaceLocked()–>destroySurface(),逐步调用改变绘制状态为NO_SURFACE–>WindowSurfaceController的destroy()最终调用到SurfaceControl的remove()来通知SurfaceFlinger来移除layer;
三、代码流程详解
1.客户端
1.1 Activity走到onresume后
从ActivityThread.handleResumeActivity方法看起
1.调用performResumeActivity,执行onResume。
2.获取WindowManager的实现类WindowManagerImpl的实例。
3.调用WindowManagerImpl.addView传入DecorView和当前布局参数WindowManager.LayoutParams。
代码路径:framework/core/java/android/app/ActivityThread.java
@Override
    public void handleResumeActivity(ActivityClientRecord r, boolean finalStateRequest,
            boolean isForward, String reason) {
			......
        // TODO Push resumeArgs into the activity for consideration
        // skip below steps for double-resume and r.mFinish = true case.
        /*1.执行onResume*/
        if (!performResumeActivity(r, finalStateRequest, reason)) {
            return;
        }
		......
		//获取Activity实例
        final Activity a = r.activity;
		......
        // If the window hasn't yet been added to the window manager,
        // and this guy didn't finish itself or start another activity,
        // then go ahead and add the window.
        //mStartedActivity在performLaunchActivity和performResumeActivity方法中被置为false
        boolean willBeVisible = !a.mStartedActivity;
		......
        if (r.window == null && !a.mFinished && willBeVisible) {
        	//获取当前Activity的PhoneWindow
            r.window = r.activity.getWindow();
            //从PhoneWindow中获取DecorView
            View decor = r.window.getDecorView();
            //将view的可见性状态设置为INVISIBLE,view不可见但是仍然占用布局空间
            decor.setVisibility(View.INVISIBLE);
            /*2.获取WindowManager的实现类WindowManagerImpl的实例*/
            ViewManager wm = a.getWindowManager();
            //获取布局参数
            WindowManager.LayoutParams l = r.window.getAttributes();
            //将phoneWindow的DecorView赋值给mDecor
            a.mDecor = decor;
            //设置窗口类型为TYPE_BASE_APPLICATION
            l.type = WindowManager.LayoutParams.TYPE_BASE_APPLICATION;
            l.softInputMode |= forwardBit;
            if (r.mPreserveWindow) {
                a.mWindowAdded = true;
                r.mPreserveWindow = false;
                // Normally the ViewRoot sets up callbacks with the Activity
                // in addView->ViewRootImpl#setView. If we are instead reusing
                // the decor view we have to notify the view root that the
                // callbacks may have changed.
                ViewRootImpl impl = decor.getViewRootImpl();
                if (impl != null) {
                    impl.notifyChildRebuilt();
                }
            }
            if (a.mVisibleFromClient) {
                if (!a.mWindowAdded) {
                    a.mWindowAdded = true;
                    /*3.传入DecorView和当前布局参数WindowManager.LayoutParams*/
                    wm.addView(decor, l);
                } else {
                    // The activity will get a callback for this {@link LayoutParams} change
                    // earlier. However, at that time the decor will not be set (this is set
                    // in this method), so no action will be taken. This call ensures the
                    // callback occurs with the decor set.
                    a.onWindowAttributesChanged(l);
                }
            }
        }
		......
    }
wm.addView(decor, l);WindowManager接口的实现是WindowManagerImpl,即实际调用的是WindowManagerImpl中的addView方法
代码路径:framework/core/java/android/view/WindowManagerImpl.java
    @Override
    public void addView(@NonNull View view, @NonNull ViewGroup.LayoutParams params) {
        applyTokens(params);
        //转交给windowManagerGlobal,添加view
        mGlobal.addView(view, params, mContext.getDisplayNoVerify(), mParentWindow,
                mContext.getUserId());
    }
WindowManagerImpl对窗口的管理交给WindowManagerGlobal,调用WindowManagerGlobal的addView方法
WindowManagerGlobal中对窗口的处理主要如下几个步骤:
1.对WindowManagerImpl传进来的参数进行检查。
2.设置WindowManager.LayoutParams中的token、title等相关属性。查看“【1.2 Token的创建与传递】”。
3.创建ViewRootImpl对象,并获取客户端与WMS通信的Session。查看“【1.3 ViewRootImpl的创建】”。
4.在WindowManagerGlobal中备份DecorView,WindowManager.LayoutParams以及ViewRootImpl。
5.调用ViewRootImpl,与WMS通信添加窗口。查看“【1.4 ViewRootImpl与WMS的通信】”。
代码路径:framework/core/java/android/view/WindowManagerGlobal.java
    public void addView(View view, ViewGroup.LayoutParams params,
            Display display, Window parentWindow, int userId) {
        /*1.对WindowManagerImpl传进来的参数进行检查*/
        if (view == null) {
            throw new IllegalArgumentException("view must not be null");
        }
        if (display == null) {
            throw new IllegalArgumentException("display must not be null");
        }
        if (!(params instanceof WindowManager.LayoutParams)) {
            throw new IllegalArgumentException("Params must be WindowManager.LayoutParams");
        }
        final WindowManager.LayoutParams wparams = (WindowManager.LayoutParams) params;
        //此处的ParentWindow即当Activity的PhoneWindow
        if (parentWindow != null) {
        	/*2.为wparams的token进行赋值*/
            parentWindow.adjustLayoutParamsForSubWindow(wparams);
        } else {
        	......
        }
        ViewRootImpl root;
        View panelParentView = null;
        synchronized (mLock) {
			......
            IWindowSession windowlessSession = null;
			......
            if (windowlessSession == null) {
           		/*3.新建ViewRootImpl,在新建时会通过WindowManagerGlobal获取session*/
                root = new ViewRootImpl(view.getContext(), display);
            } else {
                root = new ViewRootImpl(view.getContext(), display,
                        windowlessSession);
            }
            view.setLayoutParams(wparams);
			/*4.在WindowManagerGlobal中备份DecorView,WindowManager.LayoutParams以及ViewRootImpl。*/
			//当前view加入到view列表中
            mViews.add(view);
            //将新建的viewRootImpl加入到root列表中
            mRoots.add(root);
            //将当前布局参数加入到布局参数列表中
            mParams.add(wparams);
            // do this last because it fires off messages to start doing things
            try {
            	/*5.调用ViewRootImpl,设置view,panelParentView为null,与WMS通信添加窗口*/
                root.setView(view, wparams, panelParentView, userId);
            } catch (RuntimeException e) {
                // BadTokenException or InvalidDisplayException, clean up.
                if (index >= 0) {
                    removeViewLocked(index, true);
                }
                throw e;
            }
        }
    }
1.2 Token的创建与传递
parentWindow.adjustLayoutParamsForSubWindow(wparams);调用Window的adjustLayoutParamsForSubWindow()方法
在adjustLayoutParamsForSubWindow中会分别对WindowManager.LayoutParams中的token以及title进行赋值。
1.首先针对子窗口、系统窗口以及应用窗口做了不同的处理,此处我们只关注应用窗口的处理。
2.其次将当前PhoneWindow.mAppToken赋值给WindowManager.LayoutParams.token。
代码路径:framework/core/java/android/view/Window.java
    void adjustLayoutParamsForSubWindow(WindowManager.LayoutParams wp) {
        CharSequence curTitle = wp.getTitle();
        if (wp.type >= WindowManager.LayoutParams.FIRST_SUB_WINDOW &&
                wp.type
                //对子窗口的Token以及Title赋值
                ......
        } else if (wp.type = WindowManager.LayoutParams.FIRST_SYSTEM_WINDOW &&
                wp.type
                //对子窗口的Token以及Title赋值
                ......
        } else {
        	//对应用窗口的Token以及Title赋值
            if (wp.token == null) {
            	//将当前PhoneWindow的mAppToken赋值给wp.Token
                wp.token = mContainer == null ? mAppToken : mContainer.mAppToken;
            }
            //将Title设置为mAppName
            if ((curTitle == null || curTitle.length() == 0)
                    && mAppName != null) {
                wp.setTitle(mAppName);
            }
        }
        //设置为packageName
        if (wp.packageName == null) {
            wp.packageName = mContext.getPackageName();
        }
        ......
    }

        //新建Token
        super(_service.mWindowManager, new Token(), TYPE_APPLICATION, true,
                null /* displayContent */, false /* ownerCanManageAppTokens */);
        ......
}

        ......
        final Task task = r.getTask();
        final Task rootTask = task.getRootTask();
        ......
        try {
            ......
            try {
            	......
                // Create activity launch transaction.
                /*将ActivityRecord.token封装在clientTransaction中*/
                final ClientTransaction clientTransaction = ClientTransaction.obtain(
                        proc.getThread(), r.token);
                final boolean isTransitionForward = r.isTransitionForward();
                final IBinder fragmentToken = r.getTaskFragment().getFragmentToken();
                clientTransaction.addCallback(LaunchActivityItem.obtain(new Intent(r.intent),
                        System.identityHashCode(r), r.info,
                        // TODO: Have this take the merged configuration instead of separate global
                        // and override configs.
                        mergedConfiguration.getGlobalConfiguration(),
                        mergedConfiguration.getOverrideConfiguration(), r.compat,
                        r.getFilteredReferrer(r.launchedFromPackage), task.voiceInteractor,
                        proc.getReportedProcState(), r.getSavedState(), r.getPersistentSavedState(),
                        results, newIntents, r.takeOptions(), isTransitionForward,
                        proc.createProfilerInfoIfNeeded(), r.assistToken, activityClientController,
                        r.shareableActivityToken, r.getLaunchedFromBubble(), fragmentToken));
                ......
                // Schedule transaction.
                /*将clientTransaction传递给客户端*/
                mService.getLifecycleManager().scheduleTransaction(clientTransaction);
                ......
            } catch (RemoteException e) {
                ......
            }
        } finally {
            ......
        }
        ......
        return true;
    }

        ClientTransaction instance = ObjectPool.obtain(ClientTransaction.class);
        if (instance == null) {
        //创建ClientTransaction
            instance = new ClientTransaction();
        }
        instance.mClient = client;
        /*把ActivityRecord.token存到mActivityToken*/
        //private IBinder mActivityToken;
        instance.mActivityToken = activityToken;
        return instance;
    }

        final List
            final ClientTransactionItem item = callbacks.get(i);
            ......
            /*将Token传递到LaunchActivityItem中*/
            item.execute(mTransactionHandler, token, mPendingActions);
            item.postExecute(mTransactionHandler, token, mPendingActions);
            ......
        }
    }

        Trace.traceBegin(TRACE_TAG_ACTIVITY_MANAGER, "activityStart");
        //将客户端传过来的Token保存在ActivityClientRecord的token中
        ActivityClientRecord r = new ActivityClientRecord(token, mIntent, mIdent, mInfo,
                mOverrideConfig, mCompatInfo, mReferrer, mVoiceInteractor, mState, mPersistentState,
                mPendingResults, mPendingNewIntents, mActivityOptions, mIsForward, mProfilerInfo,
                client, mAssistToken, mShareableActivityToken, mLaunchedFromBubble,
                mTaskFragmentToken);
        client.handleLaunchActivity(r, pendingActions, null /* customIntent */);
        Trace.traceEnd(TRACE_TAG_ACTIVITY_MANAGER);
    }

    	......
        try {
            Application app = r.packageInfo.makeApplicationInner(false, mInstrumentation);
            ......
            synchronized (mResourcesManager) {
            	/*将ActivityClientRecord以及其对应的Token保存在mActivities中*/
            	//mActivities的类型为ArrayMap
                ......
                /*将Token赋值给Activity.mToken*/
                activity.attach(appContext, this, getInstrumentation(), r.token,
                        r.ident, app, r.intent, r.activityInfo, title, r.parent,
                        r.embeddedID, r.lastNonConfigurationInstances, config,
                        r.referrer, r.voiceInteractor, window, r.activityConfigCallback,
                        r.assistToken, r.shareableActivityToken);
                ......
        } catch (SuperNotCalledException e) {
            throw e;
        } catch (Exception e) {
        	......
        }
        return activity;
    }

        attachBaseContext(context);
        mFragments.attachHost(null /*parent*/);
        /*新建PhoneWindow*/
        mWindow = new PhoneWindow(this, window, activityConfigCallback);
        ......
        /*将客户端传过来的Token赋值给mToken*/
        mToken = token;
        ......
        /*PhoneWindow.mAppToken设置为当前客户端传递过来的Token*/
        mWindow.setWindowManager(
                (WindowManager)context.getSystemService(Context.WINDOW_SERVICE),
                mToken, mComponent.flattenToString(),
                (info.flags & ActivityInfo.FLAG_HARDWARE_ACCELERATED) != 0);
        ......
    }

    	//传递客户端的mToken给appToken
        setWindowManager(wm, appToken, appName, false);
    }
    /**
     * Set the window manager for use by this Window to, for example,
     * display panels.  This is
        /*把appToken赋值给mAppToken*/
        mAppToken = appToken;
        mAppName = appName;
        mHardwareAccelerated = hardwareAccelerated;
        if (wm == null) {
            wm = (WindowManager)mContext.getSystemService(Context.WINDOW_SERVICE);
        }
        mWindowManager = ((WindowManagerImpl)wm).createLocalWindowManager(this);
    }

        this(context, display, WindowManagerGlobal.getWindowSession(),
                false /* useSfChoreographer */);
    }
    public ViewRootImpl(@UiContext Context context, Display display, IWindowSession session) {
        this(context, display, session, false /* useSfChoreographer */);
    }
    public ViewRootImpl(@UiContext Context context, Display display, IWindowSession session,
            boolean useSfChoreographer) {
        mContext = context;
        mWindowSession = session;
        ......
    }

        synchronized (WindowManagerGlobal.class) {
            if (sWindowSession == null) {
                try {
                    // Emulate the legacy behavior.  The global instance of InputMethodManager
                    // was instantiated here.
                    // TODO(b/116157766): Remove this hack after cleaning up @UnsupportedAppUsage
                    InputMethodManager.ensureDefaultInstanceForDefaultDisplayIfNecessary();
                    /*1.获取Binder*/
                    IWindowManager windowManager = getWindowManagerService();
                    /*2.调用WMS的openSession*/
                    sWindowSession = windowManager.openSession(
                            new IWindowSessionCallback.Stub() {
                                @Override
                                public void onAnimatorScaleChanged(float scale) {
                                    ValueAnimator.setDurationScale(scale);
                                }
                            });
                } catch (RemoteException e) {
                    throw e.rethrowFromSystemServer();
                }
            }
            return sWindowSession;
        }
    }

    	/*新建Session*/
        return new Session(this, callback);
    }

        setView(view, attrs, panelParentView, UserHandle.myUserId());
    }
    /**
     * We have one child
     */
    public void setView(View view, WindowManager.LayoutParams attrs, View panelParentView,
            int userId) {
        synchronized (this) {
            if (mView == null) {
                mView = view;
                ......
                //将布局参数拷贝纸mWindowAttributes
                mWindowAttributes.copyFrom(attrs);
                //设置包名
                if (mWindowAttributes.packageName == null) {
                    mWindowAttributes.packageName = mBasePackageName;
                }
                mWindowAttributes.privateFlags |=
                        WindowManager.LayoutParams.PRIVATE_FLAG_USE_BLAST;
                attrs = mWindowAttributes;
                ......
                // Keep track of the actual window flags supplied by the client.
                //获取当前布局的flags
                mClientWindowLayoutFlags = attrs.flags;
                ......
                int res; /* = WindowManagerImpl.ADD_OKAY; */
                // Schedule the first layout -before- adding to the window
                // manager, to make sure we do the relayout before receiving
                // any other events from the system.
                /*请求布局,对应服务端layoutWindow流程*/
                requestLayout();
                InputChannel inputChannel = null;
                if ((mWindowAttributes.inputFeatures
                        & WindowManager.LayoutParams.INPUT_FEATURE_NO_INPUT_CHANNEL) == 0) {
                    inputChannel = new InputChannel();
                }
                ......
                try {
                	......
                	/*与服务端进行Binder通信,调用Session的addToDisplayAsUser方法*/
                	//执行addWindow的相关流程
                    res = mWindowSession.addToDisplayAsUser(mWindow, mWindowAttributes,
                            getHostVisibility(), mDisplay.getDisplayId(), userId,
                            mInsetsController.getRequestedVisibilities(), inputChannel, mTempInsets,
                            mTempControls);
                    ......
                } catch (RemoteException e) {
                	......
                } finally {
                    if (restore) {
                        attrs.restore();
                    }
                }
                ......
                if (DEBUG_LAYOUT) Log.v(mTag, "Added window " + mWindow);
                if (res
- setView
- addView
- addView
- handleResumeActivity


还没有评论,来说两句吧...